[Vuetify.js] treeview 사용법 정리
vuetify.js 라이브러리의 treeview를 사용하는 방법에 대한 정리입니다.
v-treeview API는 아래 링크를 참고하면 되고, Props, Functions, Events 등의 정보를 확인할 수 있습니다.
v-treeview API
API for the v-treeview component.
vuetifyjs.com
Treeview에 대한 기본적인 화면 구성 및 샘플 소스 코드 정보는 아래 링크에서 확인가능합니다.
기본적인 사용법 및 예제를 참고할 수 있습니다.
Treeview component
The treeview component is a user interface that is used to represent hierarchical data in a tree structure.
vuetifyjs.com
다음 예제는 Activatable 예제입니다.
Treeview를 클릭하였을 때 선택된 노드의 값에 대한 정보를 확인하는 방법
제목그대로입니다. 트리를 클릭 후 해당 값으로 상세정보를 불러오거나 선택값을 출력해줄 때 활용하는 방법입니다.
트리뷰는 onclick이벤트 대신 update:active 이벤트를 사용하여 캐취할 수 있습니다.
| 속성 | 내용 |
| rounded | 트리를 선택했을 때 라운드 타입의 배경 지정 |
| shaped | 트리를 선택했을 때 직사각형 타입의 배경 지정 |
| items | 트리를 구성하는 필요한 데이터 |
| activatable | treeview의 종류 중 하나로 |
| open-all | 모든 트리 노드를 모두 펼쳐서 보여줌 |
| open-on-click | 트리를 클릭했을 때 펼침 |
| dense | 트리사이의 간격을 좁혀줌 |
| update:active | 트리를 선택했을 때 값을 확인하기 위한 이벤트로 노드를 선택했을 때 실행할 메서드(함수)를 정의합니다. |
| retrun-obejct | return-object= true 가 기본값으로 활성화하는 경우 노드 클릭시 노드의 모든 값을 확인할 수 있습니다. false 처리하거나 속성 제거시, 노드 클릭하는 경우 키값만 리턴됩니다. |
| item-key | 노드의 키값으로 사용될 key값을 트리를 구성하는 데이터의 id, name으로 정의합니다. item-key=”name” item-key=”id” |
<template>
<v-container>
<v-layout row wrap>
Vuetify.js TreeView 샘플 코드
<v-row>
<v-col>
<v-treeview
rounded
activatable
return-object
:items="treeItems"
:open-all = true
:open-on-click = false
dense
@update:active="selected"
></v-treeview>
</v-col>
<v-divider vertical></v-divider>
<v-col
class="pa-6"
cols="6"
>
<template v-if="!selection.length">
No nodes selected.
</template>
<template v-else>
<div
v-for="node in selection"
:key="node.id"
>
{{ node.name }}
</div>
</template>
</v-col>
</v-row>
</v-layout>
</v-container>
</template>
<script>
export default {
name: 'Product',
components: {
},
data: () => ({
selection: [],
treeItems: [],
active: [],
}),
created() {
this.treeItems = [
{
id: 1,
name: '전체',
children: [
{ id: 2, name: 'Child #1' },
{ id: 3, name: 'Child #2' },
{
id: 4,
name: 'Child #3',
children: [
{ id: 5, name: 'Grandchild #1' },
{ id: 6, name: 'Grandchild #2' },
],
},
],
},
];
},
mounted() {
},
methods: {
selected(node) {
this.selection = node;
console.log(`${JSON.stringify(this.selection)}`);
},
},
};
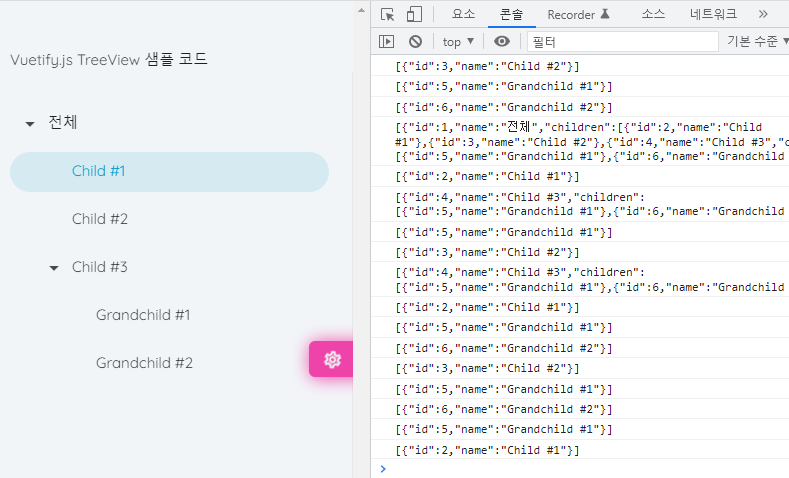
</script>[트리뷰 화면 결과]
노드를 클릭했을 때 선택된 노드에 대한 값을 console.log로 찍어보는 예제입니다.
retrun-object 속성을 활성화 하였음으로 모든 값을 확인할 수 있습니다.
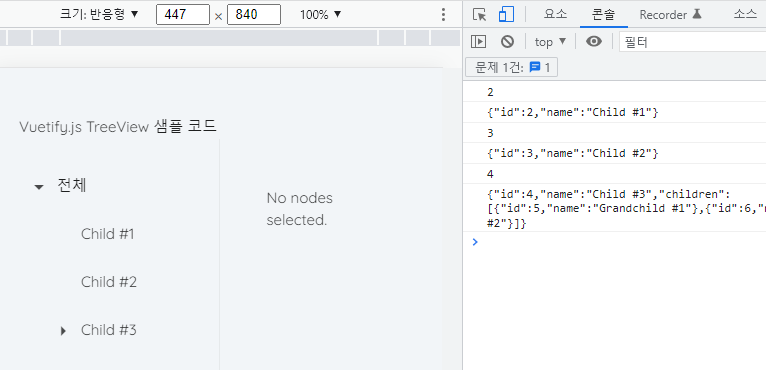
Treeview에 onclick 이벤트를 활성화 하는 방법
두번째 방법입니다. 기능은 동일합니다.
필요한 속성값들은 첫번째 방법과 같이 추가해주면 됩니다
여기서 보셔야할 부분은 템플릿을 slot, slot-scope를 사용하였다는 점입니다.
<template>
  <v-container>
    <v-layout row wrap>
      Vuetify.js TreeView 샘플 코드
      <v-row>
        <v-col>
          <v-treeview
          :items="treeItems">
          <template slot="label" slot-scope="{ item }">
          <div @click="selected(item)">{{ item.name }}</div>
          </template>
          </v-treeview>
        </v-col>
        <v-divider vertical></v-divider>
        <v-col
          class="pa-6"
          cols="6"
        >
          <template v-if="!selection.length">
            No nodes selected.
          </template>
          <template v-else>
            <div
              v-for="node in selection"
              :key="node.id"
            >
              {{ node.name }}
            </div>
          </template>
        </v-col>
      </v-row>
    </v-layout>
  </v-container>
</template>

<script>

export default {
  name: 'Product',
  components: {
  },
  data: () => ({
    selection: [],
    treeItems: [],
    active: [],
  }),
  created() {
    this.treeItems = [
      {
        id: 1,
        name: '전체',
        children: [
          { id: 2, name: 'Child #1' },
          { id: 3, name: 'Child #2' },
          {
            id: 4,
            name: 'Child #3',
            children: [
              { id: 5, name: 'Grandchild #1' },
              { id: 6, name: 'Grandchild #2' },
            ],
          },
        ],
      },
    ];
  },
  mounted() {
  },
  methods: {
    selected(node) {
      console.log(`${node.id}`);
      this.selection = node;
      console.log(`${JSON.stringify(this.selection)}`);
    },
  },
};
</script>
[트리뷰 화면 결과]
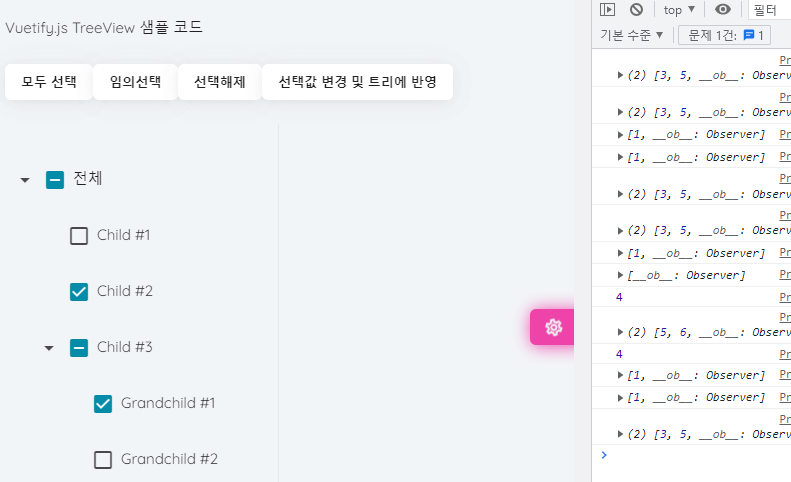
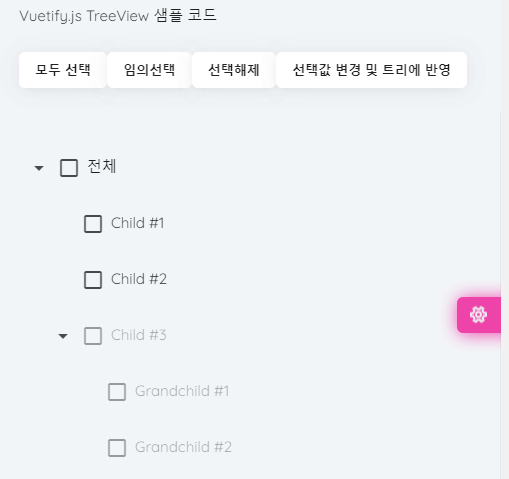
체크박스 트리뷰(Treeview)를 사용하는 방법
이번에는 체크박스가 달려있는 treeview를 구성하는 방법에 대해 알아봅니다.
체크박스 속성값을 사용하기 위해서는 트리 속성 중에 selectable 속성을 지정합니다.
또 하나로 selection-type를 지정해야하고, v-model를 이용하여 선택한 노드에 대한 바인딩할 객체를 지정해야합니다.
| 속성 | 내용 |
| selection-type | Treeview는 두 가지 선택 유형을 지원합니다. leaf, independent 값 중에 설정가능하며 , leaf를 설정하는 경우 해당 노드의 제일 마지막 노드의 값을 선택되는 개념이고 independent로 설정하는 경우 선택한 노드를 선택한다는 개념입니다. |
| selected-color | 체크박스 선택시 색상을 변경합니다. |
| item-disabled | 선택할 수 없는 노드를 만들려면 해당 노드의 값 중에 true 또는 false 값을 지정하여 가져온 후 해당 칼럼값을 대입하면 됩니다. |
| on-icon off-icon expand-icon indeterminate-icon |
트리 노드에 아이콘 추가 (off-icon=”mdi-bookmark”) expand-icon=”mdi-chevron-down” on-icon=”mdi-bookmark” off-icon=”mdi-bookmark-outline” indeterminate-icon=”mdi-bookmark-minus” |
| input | 체크박스를 체크 또는 해제할 때 실행할 메서드(함수)를 정의합니다. |
<template>
  <v-container>
    <v-layout row wrap>
      Vuetify.js TreeView 샘플 코드
      <v-row>
        <v-col>
      <v-btn @click="checkAll">모두 선택</v-btn>
      <v-btn @click="customCheck([3,5])">임의선택</v-btn>
      <v-btn @click="uncheckAll">선택해제</v-btn>
      <v-btn @click="changeCheck">선택값 변경 및 트리에 반영</v-btn>
        </v-col>
      </v-row>
      <v-row>
        <v-col>
          <v-treeview
            rounded
            v-model="selection"
            :items="treeItems"
            selectable
            :selection-type="selectionType"
            :open-all = true
            :open-on-click = false
            :open.sync="openNode"
            @update:open="onOpen"
            @input="onSelected"
          ></v-treeview>
        </v-col>
        <v-divider vertical></v-divider>
        <v-col
          class="pa-6"
          cols="6"
        >
          <template v-if="!selection.length">
            No nodes selected.
          </template>
          <template v-else>
            <div
              v-for="node in selection"
              :key="node.id"
            >
              {{ node.name }}
            </div>
          </template>
        </v-col>
      </v-row>
    </v-layout>
  </v-container>
</template>

<script>

export default {
  name: 'Product',
  components: {
  },
  data: () => ({
    selection: [],
    treeItems: [],
    selectionType: 'leaf', // independent
    openNode: [0,1],
  }),
  created() {
    this.selection = [];
    this.treeItems = [
      {
        id: 1,
        name: '전체',
        locked: false,
        children: [
          { id: 2, name: 'Child #1' },
          { id: 3, name: 'Child #2' },
          {
            id: 4,
            name: 'Child #3',
            locked: true,
            children: [
              { id: 5, name: 'Grandchild #1' },
              { id: 6, name: 'Grandchild #2' },
            ],
          },
        ],
      },
    ];
  },
  mounted() {
  },
  methods: {
    checkAll() {
      this.selection = [1];
      console.log(this.selection);
    },
    customCheck(arr) {
      this.selection = arr;
      console.log(this.selection);
    },
    uncheckAll() {
      this.selection = [];
    },
    changeCheck() {
      console.log(this.selection);
      this.selection[0] = 3;

      this.selection.push();
      this.$set(this.selection, 0, 4);
      console.log(this.selection[0]);
    },
    onOpen(items) { // 열려있는 노드의 key값 리턴(선택된 값이 아닌...)
      this.openNode = items
      alert(this.openNode);
    },
    onSelected(key) {
      console.log(`${JSON.stringify(key)}`);
    },
  },
};
</script>
[트리뷰 화면 결과]
@input를 사용하는 방법 대신 watch를 사용하여 v-model에 바인딩된 변수를 모니터링해도 동일하게 클릭한 이벤트 효과를 볼 수 있다.
<template>
<!--
on-icon="mdi-bookmark"
off-icon="mdi-bookmark-outline"
indeterminate-icon="mdi-bookmark-minus"
-->
<v-treeview
rounded
selectable
:items="itemsTree"
:selection-type="selectionType"
v-model="selectItem"
:open.sync="openNode"
dense
expand-icon="mdi-chevron-down"
@input="onSelected"
></v-treeview>
</template>
watch: {
treeItems: {
handler(newValue){
this.itemsTree = this.getTreeNestedArray(this.treeItems);
},
immediate: true,
},
selectItem: {
handler(val){
console.log(`### selectItem.length : ${val.length}`);
if (val.length > 0) {
this.$emit('treeChecked', val);
}
},
immediate: true,
},
selectedIds: {
handler(val){
this.clearChecked();
// 선택되어진 노드가 있는 경우
if (val.length > 0){
val.forEach((item) => {
this.checkedTreeItems(item);
});
}
},
immediate: true,
},
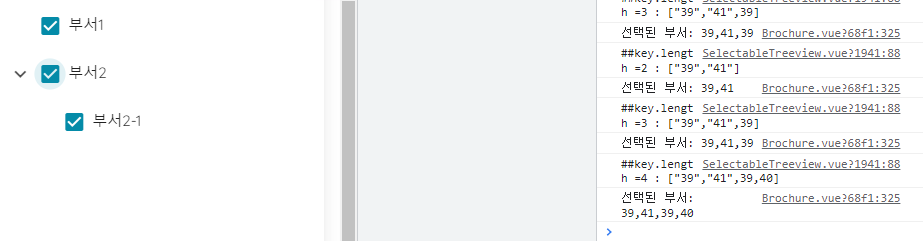
},트리뷰 데이터 바인딩시 주의할 점
트리 노드 키값이 int형인지 string형인지 자료형 구분을 확실하게 해야한다.
그렇지 않으면 2시간이 넘는 동안 다른곳에서 원인을 찾는 삽질을 하게 된다.
DB에 저장한 데이터를 바인딩했는데 문자열이었다.
그러나 트리뷰에 바인딩된 트리 데이터는 int형이다.
그래서 서로 다른 값으로 인식하여 기존값이 체크된 형태로 결과값이 전달되었다.
(treeview)트리뷰 disable 처리하는 방법
item-disabled 속성을 사용하여 값을 지정합니다.
선택할 수 없는 노드를 만들려면 해당 노드의 값 중에 true 또는 false 값을 지정하여 가져온 후 해당 칼럼값을 대입하면 됩니다.
<template>
  <v-container>
    <v-layout row wrap>
      Vuetify.js TreeView 샘플 코드
      <v-row>
        <v-col>
      <v-btn @click="checkAll">모두 선택</v-btn>
      <v-btn @click="customCheck([3,5])">임의선택</v-btn>
      <v-btn @click="uncheckAll">선택해제</v-btn>
      <v-btn @click="changeCheck">선택값 변경 및 트리에 반영</v-btn>
        </v-col>
      </v-row>
      <v-row>
        <v-col>
          <v-treeview
            rounded
            v-model="selection"
            :items="treeItems"
            selectable
            :selection-type="selectionType"
            :open-all = true
            :open-on-click = false
            selected-color="red"
            item-disabled="locked"
          ></v-treeview>
        </v-col>
        <v-divider vertical></v-divider>
        <v-col
          class="pa-6"
          cols="6"
        >
          <template v-if="!selection.length">
            No nodes selected.
          </template>
          <template v-else>
            <div
              v-for="node in selection"
              :key="node.id"
            >
              {{ node.name }}
            </div>
          </template>
        </v-col>
      </v-row>
    </v-layout>
  </v-container>
</template>

<script>

export default {
  name: 'Product',
  components: {
  },
  data: () => ({
    selection: [],
    treeItems: [],
    selectionType: 'leaf', // independent
  }),
  created() {
    this.selection = [];
    this.treeItems = [
      {
        id: 1,
        name: '전체',
        locked: false,
        children: [
          { id: 2, name: 'Child #1' },
          { id: 3, name: 'Child #2' },
          {
            id: 4,
            name: 'Child #3',
            locked: true,
            children: [
              { id: 5, name: 'Grandchild #1' },
              { id: 6, name: 'Grandchild #2' },
            ],
          },
        ],
      },
    ];
  },
  mounted() {
  },
  methods: {
    checkAll() {
      this.selection = [1];
      console.log(this.selection);
    },
    customCheck(arr) {
      this.selection = arr;
      console.log(this.selection);
    },
    uncheckAll() {
      this.selection = [];
    },
    changeCheck() {
      console.log(this.selection);
      this.selection[0] = 3;

      this.selection.push();
      this.$set(this.selection, 0, 4);
      console.log(this.selection[0]);
    },
  },
};
</script>
[트리뷰 화면 결과]
프로그래밍방식으로 선택된 노드를 변경하는 방법
위 샘플스크립트에 보면 changeCheck()함수가 있습니다.
    changeCheck() {
      console.log(this.selection);
      this.selection[0] = 3;

      this.selection.push();
      this.$set(this.selection, 0, 4);
      console.log(this.selection[0]);
    },
선택된 값을 변경하고 싶은경우, this.selection[0] = 3 과 같은 방법으로 변경하면 됩니다.
그러나 뒤에 일련의 작업이 따라야 합니다.
push()혹은 $set()함수를 사용해서 처리해주어야 트리뷰에 반영됩니다.
Treeview의 open-all이 동작하지 않을 때 처리 방법
axios로 데이터를 DB에서 조회 후 nested array로 생성한 후 트리를 바인딩하는 v-model 변수에 적용하면
트리뷰의 기본설저으로 open-all를 하였음에도 열리지 않는 경우가 발생합니다.
트리 선언시 :open.sync=”openNode” 지정해주어야합니다.
그런다음 아래코드와 같이 watch를 사용하여 openNode를 감시 처리하면 가능합니다.
  data: () => ({
    itemsTree: [],
    selectItem: [],
    openNode: [],
  }),
  created() {
  },
  mounted() {
  },
  watch: {
    treeItems: {
        handler(newValue){
            this.itemsTree = this.getTreeNestedArray(this.treeItems);
            this.openNode = [0];
        },
        immediate: true,
    },
    selectItem : {
        handler(newValue){
            this.$emit('refsdKey', this.selectItem);
        },
        immediate: true,
    },
    openNode : {
        handler(val){
          if (this.itemsTree[0]!== undefined){
            const treeid = this.itemsTree[0].id;
            if (!val.includes(treeid)) {
              val.push(treeid);
            }
          }

        },
        immediate: true,
    },

  },
vuetify treeview every objects was opened, but i did not set “open-all” option
i’m setting up vuetify’s treeview component for my project. i clicked treeview’s folder objects, every objects opened. but i did not set ‘open-all’ option. my project is based vue cli 3 and my ESL…
stackoverflow.com
Vuetify.js treeview의 depth(level) 깊이를 구하는 방법
Vuetify: in a treeview slot, how to know at which depth I am in the tree?
How, in a <v-treeview> slot, to know at which depth I am in the tree ? <v-treeview :items=”myItems” :open=”open”> <template v-slot:label=”{ item, open, sel…
stackoverflow.com
Vuetify treeview open & search (검색시 나오는 노드의 상위노드를 open상태로 만들기)
OKKY | Vuetify treeview open & search (검색시 나오는 노드의 상위노드를 open상태로 만들기)
vuetify의 treeview를 사용하고 있습니다.. 그런데 search를 하면 해당이름이 포함된 노드가 나오기는 하나 하위인 경우 접혀져서 나옵니다. 저는 검색시 나오는 노드의 상위노드를 open상태로 만들고
okky.kr
컴포넌트로 트리뷰를 구성하여 공통으로 사용할 수 있는 방법
다음 두 개의 예제를 참고하면 만들 수 있어요.
Expand v-treeview based on filtered results
In the tree view component, I would like to open all the nodes where there is some search text. But the expected is not happening. Desired output: Open all the parents where there’s some search te…
stackoverflow.com
Expand v-treeview based on filtered results
In the tree view component, I would like to open all the nodes where there is some search text. But the expected is not happening. Desired output: Open all the parents where there’s some search te…
stackoverflow.com
V-treeview using open-all not showing child nodes (only parent)
I have solved my own problem here. My problem was that the items that I was binding to the tree were composed of six parent items. Each parent item had multiple children items contained in the field “children”. I had to flatten all the items out into a
forum.vuejs.org
이정도 파악되면 트리뷰 구현에 문제는 없을 것입니다.
[REFERENCE]
- https://stackoverflow.com/questions/60955640/vuetify-v-treeview-how-to-open-programmatically-a-node
- https://vuejscode.com/vuetify-treeview-detect-when-click-or-select-on-selectable-item