[SwiftUI] @ObservedObject 프로퍼티 래퍼 실습 튜토리얼 예제

구독(Observable) 객체는 특정 상태가 앱 내의 몇몇 SwiftUI 뷰에 의해 사용되어야 할 경우에 가장 적합하다.
그런데 어떤 뷰에서 다른 뷰로 이동(navigation)하는데 이동될 뷰에서도 동일한 구독 객체에 접근해야 한다면, 이동할 때 대상 뷰로 구독 객체에 대한 참조체를 전달해야 할 것이다.
Observable 객체는 시간이 지남에 따라 반복적으로 변하는 데이터 값인 동적 데이터를 래핑하는 데 사용될 때 특히 강력하다.
이론적인 내용은 [SwiftUI] @ObservedObject 프로퍼티 래퍼는 언제 왜 사용하는가? 포스팅을 참고하자.
코드 실습을 해보자
iOS 앱 프로젝트를 하나 생성 후 ObservableObject 프로토콜을 구현하는 데이터 클래스를 추가한다. 코드 에디터에 다음과 같이 TimerData 클래스를 구현한다.
[TimerData.swift]
이 클래스는 ObservableObject 프로토콜을 구현하는 것으로 선언되었다.
import Foundation
import Combine

class TimerData : ObservableObject {
    @Published var timeCount = 0
    var timer : Timer?

    init() {
      timer = Timer.scheduledTimer(timeInterval: 1.0,
        target: self,
        selector: #selector(timerDidFire),
        userInfo: nil,
        repeats: true)
     }

     @objc func timerDidFire() {
        timeCount += 1
     }

     func resetCount() {
        timeCount = 0
     }
 }
[ContentView .swift] 레이아웃 설계하기
import SwiftUI

struct ContentView: View {

    @ObservedObject var timerData: TimerData = TimerData()


    var body: some View {

        NavigationView {
            VStack {
                Text("Timer count = (timerData.timeCount)")
                    .font(.largeTitle)
                    .fontWeight(.bold)
                    .padding()

                Button(action: resetCount) {
                    Text("Reset Counter")
                }

            }
        }

    }

    func resetCount() {
        timerData.resetCount()
    }
}

struct ContentView_Previews: PreviewProvider {
    static var previews: some View {
        ContentView()
    }
}
이렇게 수정했다면 라이브 프리뷰 버튼을 눌러 뷰를 테스트해보자. 라이브 프리뷰가 시작되면 카운터가 증가하기 시작한다.
[SecondView.swift] 레이아웃 설계하기
import SwiftUI

struct SecondView: View {

    @ObservedObject var timerData: TimerData

    var body: some View {
        VStack {
            Text("Second View")
            	.font(.largeTitle)

            Text("Timer Count = (timerData.timeCount)")
            	.font(.headline)
        }
        .padding()
    }
}

// 교재와 swiftui버전이 다르다보니 오류가 발생해서 주석처리했다.
//struct SecondView_Previews: PreviewProvider {
//    static var previews: some View {
//        SecondView(timerData: TimerData())
//    }
//}
ContentView와 SecondView 모두 동일한 TimerData 인스턴스를 사용하려면
사용자가 두 번째 화면으로 이동할 때 첫 번째 뷰에 있는 ObservedObject 객체를 SecondView에 전달해야 한다.
//내비게이션 링크 추가
NavigationLink(destination:
                SecondView(timerData: timerData)) {
    Text("Next Screen")
}
.padding()
ContentView에 내비게이션 링크를 추가해준다.
import SwiftUI

struct ContentView: View {

    @ObservedObject var timerData: TimerData = TimerData()


    var body: some View {

        NavigationView {
            VStack {
                Text("Timer count = (timerData.timeCount)")
                    .font(.largeTitle)
                    .fontWeight(.bold)
                    .padding()

                Button(action: resetCount) {
                    Text("Reset Counter")
                }

                //내비게이션 링크 추가
                NavigationLink(destination:
                                SecondView(timerData: timerData)) {
                    Text("Next Screen")
                }
                .padding()
            }
        }

    }

    func resetCount() {
        timerData.resetCount()
    }
}

struct ContentView_Previews: PreviewProvider {
    static var previews: some View {
        ContentView()
    }
}
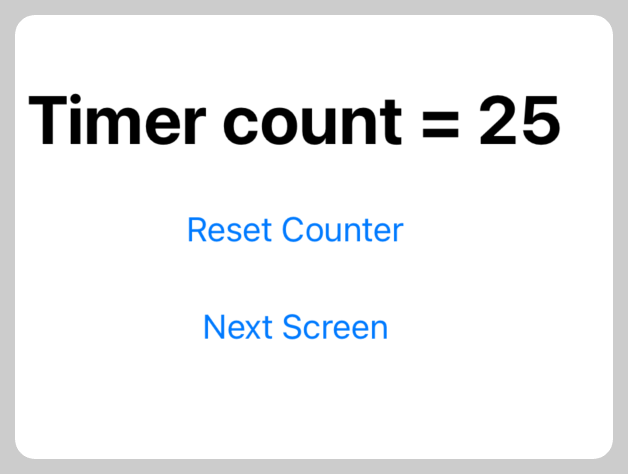
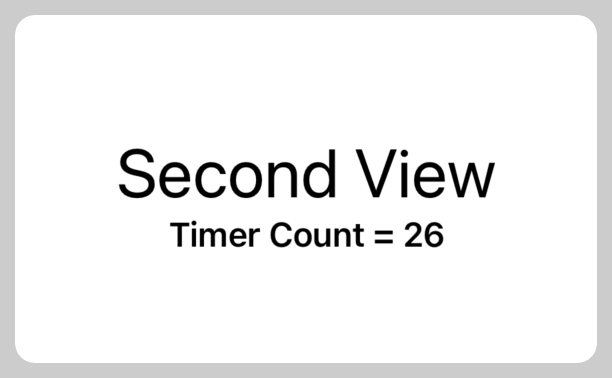
앱을 실행하면 현재의 카운터 값이 증가한다. 이 때 Next Screen 링크를 클릭하여
두 번째 뷰가 표시될때 첫번째 뷰에서의 마지막 카운트값이 계속해서 카운팅이 이어지는지 확인할 수 있다.
이것은 두 개의 뷰 모두가 동일한 Observable 객체 인스턴스를 구독하고 있음을 확인할 수 있다.
위 내용은 알라딘 eBook <핵심만 골라 배우는 SwiftUI 기반의 iOS 프로그래밍> (닐 스미스 지음, 황반석 옮김) 의 내용을 토대로 실습한 내용임을 밝힌다.
