[android : kotlin] 코틀린 뷰페이저(ViewPager) 사용 예제 (PagerAdapter)
뷰페이저(ViewPager)는 스크린 화면을 좌우로 스와이프(swipe)를 통해 컨텐츠 전환을 할 수 있는 컨테이너 이다. 뷰페이저(ViewPager)는 데이터를 페이지 단위로 표시한다. 뷰페이저는 뷰그룹(ViewGroup)으로 부터 상속된다. 페이저어댑터(PagerAdatper)를 사용하여 뷰페이저를 생성한다. PagerAdapter 클래스를 상속받아 오버라이드 해야할 메서드는 instantiateItem() , destroyItem(), getCount(), isViewFromObject() 총 4가지 가 있다. OnPageChangeListener()를 사용하여 뷰가 전환될 때 이벤트 처리를 할 수 있다.
| instantiateItem(ViewGroup container, int position) | position에 해당하는 페이지를 생성한다. |
| destroyItem(ViewGroup container, int position, Object object) | position 위치의 페이지를 제거한다. |
| getCount() | 사용 가능한 뷰의 갯수를 리턴한다. |
| isViewFromObject(View view, Object object) | instantiateItem에서 만든 객체를 사용할 것인가를 판단한다. |
제일 먼저 페이지로 사용할 레이아웃을 개발자가 원하는 만큼 만든다. 3개의 레이아웃을 추가할 예정이다.
레이아웃 추가는 안드로이드 스튜디오 UI를 통해서 해도 되며, 직접 xml를 작성하여도 된다.
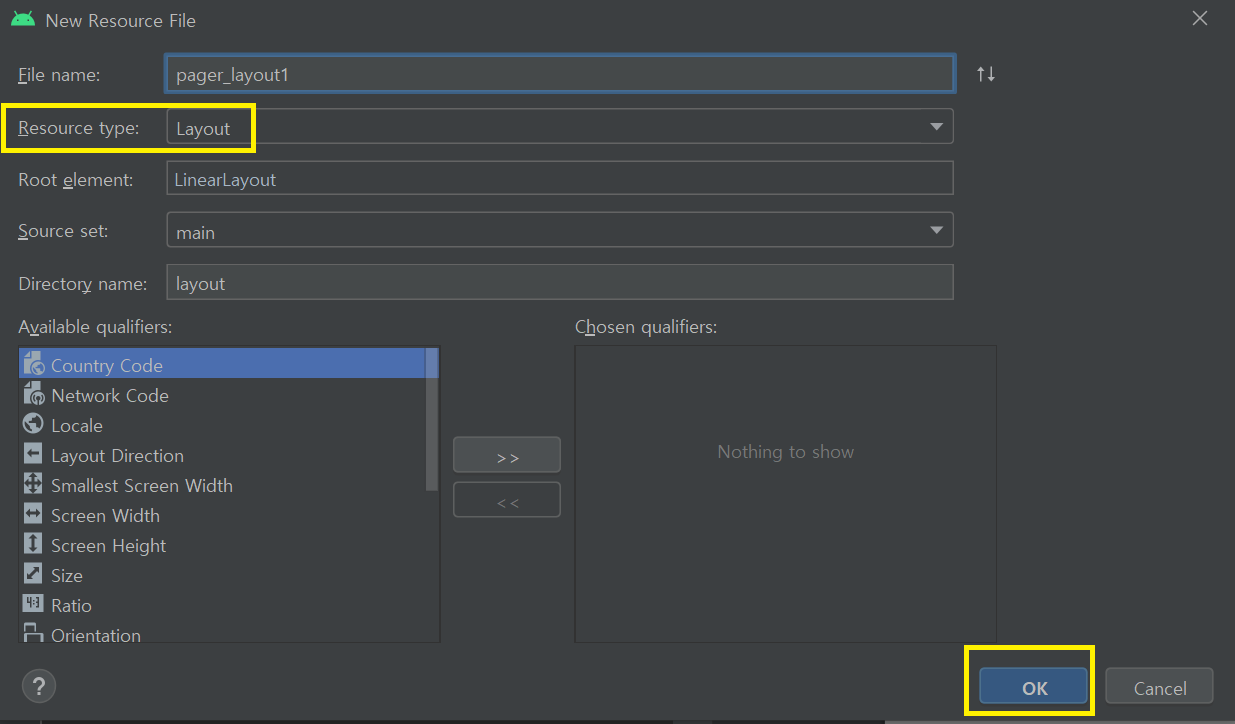
왼쪽 Project탭에서 res폴더를 클릭 후 마우스 오른쪽 버튼을 눌러 NEW > Android Resource File 를 클릭한다.
리소스 타입으로 Layout를 선택하고, 레이아웃File name를 타이핑 후 OK버튼을 클릭하면 res/layout/폴더에 추가가 된다.
[pager_layout1.xml]
<?xml version="1.0" encoding="utf-8"?>
<LinearLayout xmlns:android="http://schemas.android.com/apk/res/android"
    android:orientation="vertical" android:layout_width="match_parent"
    android:layout_height="match_parent">

    <TextView
        android:id="@+id/textView"
        android:layout_width="match_parent"
        android:layout_height="match_parent"
        android:gravity="center"
        android:text="Page1"
        android:textAppearance="@style/TextAppearance.AppCompat.Display4" />
</LinearLayout>
[pager_layout2.xml]
<?xml version="1.0" encoding="utf-8"?>
<LinearLayout xmlns:android="http://schemas.android.com/apk/res/android"
    android:orientation="vertical" android:layout_width="match_parent"
    android:layout_height="match_parent"
    android:background="@color/colorPrimary">

    <TextView
        android:id="@+id/textView"
        android:layout_width="match_parent"
        android:layout_height="match_parent"
        android:gravity="center"
        android:text="Page2"
        android:textAppearance="@style/TextAppearance.AppCompat.Display4" />

</LinearLayout>
[pager_layout3.xml]
<?xml version="1.0" encoding="utf-8"?>
<LinearLayout xmlns:android="http://schemas.android.com/apk/res/android"
    android:orientation="vertical" android:layout_width="match_parent"
    android:layout_height="match_parent"
    android:background="@color/colorPrimaryDark">

    <TextView
        android:id="@+id/textView"
        android:layout_width="match_parent"
        android:layout_height="match_parent"
        android:gravity="center"
        android:text="Page3"
        android:textAppearance="@style/TextAppearance.AppCompat.Display4" />

</LinearLayout>
[MainActivity.kt]
package edu.kotlin.study

import androidx.appcompat.app.AppCompatActivity
import android.os.Bundle
import android.util.Log
import android.view.*
import android.widget.AdapterView
import android.widget.ArrayAdapter
import androidx.viewpager.widget.PagerAdapter
import androidx.viewpager.widget.ViewPager
import kotlinx.android.synthetic.main.activity_main.*

class MainActivity : AppCompatActivity() {

    var viewList = ArrayList<View>()

    override fun onCreate(savedInstanceState: Bundle?) {
        super.onCreate(savedInstanceState)
        setContentView(R.layout.activity_main)

        viewList.add(layoutInflater.inflate(R.layout.pager_layout1, null))
        viewList.add(layoutInflater.inflate(R.layout.pager_layout2, null))
        viewList.add(layoutInflater.inflate(R.layout.pager_layout3, null))


        viewPager1.adapter = CustomPagerAdapter()

        viewPager1.addOnPageChangeListener(object : ViewPager.OnPageChangeListener {
            //페이지가 스크롤 되었을 때
            override fun onPageScrolled(
                position: Int,
                positionOffset: Float,
                positionOffsetPixels: Int
            ) {
                textView1.text = "$position 번째 뷰"
            }

            override fun onPageSelected(position: Int) {
                //페이지를 클릭했을 때
                //textView1.text = "$position 뷰 클릭됨"
            }

            //스크롤 상태가 변경되었을 때
            override fun onPageScrollStateChanged(state: Int) {
                Log.d("TAG", "onPageScrollStateChanged : $state")

                //state는(0,1,2) 총 3가지 값이 존재
                //0 : SCROLL_STATE_IDLE --> 종료
                //1 : SCROLL_STATE_DRAGGING --> 드래그중
                //2 : SCROLL_STATE_SETTLING  --> 페이지 전환 완료
            }

        })

//        //뷰페이지 터치 및 스크롤 방지 : 아래 코드처럼 람다식으로 변경 가능하다.
//        viewPager1.setOnTouchListener(object : View.OnTouchListener {
//            override fun onTouch(v: View?, event: MotionEvent?): Boolean {
//                return true
//            }
//        })
//
        //뷰페이지 터치 및 스크롤 방지
        // 버튼을 통하여 다음페이지로 넘어가야할 경우 활용한다. 사용자의 동의를 받아야하는 경우
        //viewPager1.setOnTouchListener { v, event -> true }


    }

    inner class CustomPagerAdapter : PagerAdapter() {
        override fun getCount(): Int {
            return viewList.size  //페이지를3개 만들었다.
        }

        //특수문자로 묶으면 키워드도 변수로 설정가능한 코틀린(`object`) --> 다른 변수로 변경 가능하다.
        override fun isViewFromObject(view: View, `object`: Any): Boolean {
            return view == `object`
        }

//        override fun isViewFromObject(view: View, obj: Any): Boolean {
//            return view == obj
//        }

        override fun instantiateItem(container: ViewGroup, position: Int): Any {
            viewPager1.addView(viewList[position])
            return viewList[position]
            //return super.instantiateItem(container, position)
        }

        override fun destroyItem(container: ViewGroup, position: Int, `object`: Any) {
            //페이지 삭제
            viewPager1.removeView(`object` as View)
            //super.destroyItem(container, position, `object`)
        }

    }


}
뷰페이지의 화면 전환을 사용자의 동의가 필요한 경우 터치와 스크롤 기능을 해제할 수 있다.
//        //뷰페이지 터치 및 스크롤 방지 : 아래 코드처럼 람다식으로 변경 가능하다.
//        viewPager1.setOnTouchListener(object : View.OnTouchListener {
//            override fun onTouch(v: View?, event: MotionEvent?): Boolean {
//                return true
//            }
//        })
//
        //뷰페이지 터치 및 스크롤 방지
        //버튼을 통하여 다음페이지로 넘어가야할 경우 활용한다. 사용자의 동의를 받아야하는 경우
        viewPager1.setOnTouchListener { v, event -> true }
[activity_main.xml]
<?xml version="1.0" encoding="utf-8"?>
<LinearLayout
    xmlns:android="http://schemas.android.com/apk/res/android"
    android:layout_width="match_parent"
    android:layout_height="match_parent"
    android:orientation="vertical">

    <TextView
        android:id="@+id/textView1"
        android:layout_width="match_parent"
        android:layout_height="wrap_content"
        android:gravity="center"
        android:text="텍스트뷰"
        android:textAppearance="@style/TextAppearance.AppCompat.Display2" />

    <androidx.viewpager.widget.ViewPager
        android:id="@+id/viewPager1"
        android:layout_width="match_parent"
        android:layout_height="match_parent" />


</LinearLayout>
[build.gradle(:app)]
apply plugin: 'com.android.application'
apply plugin: 'kotlin-android'
apply plugin: 'kotlin-android-extensions'

android {
    compileSdkVersion 29

    defaultConfig {
        applicationId "edu.kotlin.study"
        minSdkVersion 22
        targetSdkVersion 29
        versionCode 1
        versionName "1.0"

        testInstrumentationRunner "androidx.test.runner.AndroidJUnitRunner"
    }

    buildTypes {
        release {
            minifyEnabled false
            proguardFiles getDefaultProguardFile('proguard-android-optimize.txt'), 'proguard-rules.pro'
        }
    }
}

dependencies {
    implementation fileTree(dir: "libs", include: ["*.jar"])
    implementation "org.jetbrains.kotlin:kotlin-stdlib:$kotlin_version"
    implementation 'androidx.core:core-ktx:1.3.1'
    implementation 'androidx.appcompat:appcompat:1.2.0'
    implementation 'androidx.constraintlayout:constraintlayout:2.0.1'
    testImplementation 'junit:junit:4.12'
    androidTestImplementation 'androidx.test.ext:junit:1.1.2'
    androidTestImplementation 'androidx.test.espresso:espresso-core:3.3.0'

}