[android : kotlin] 코틀린 TabHost (TabLayout) 사용방법 및 예제 – 탭 위치 상단 / 하단 배치 방법
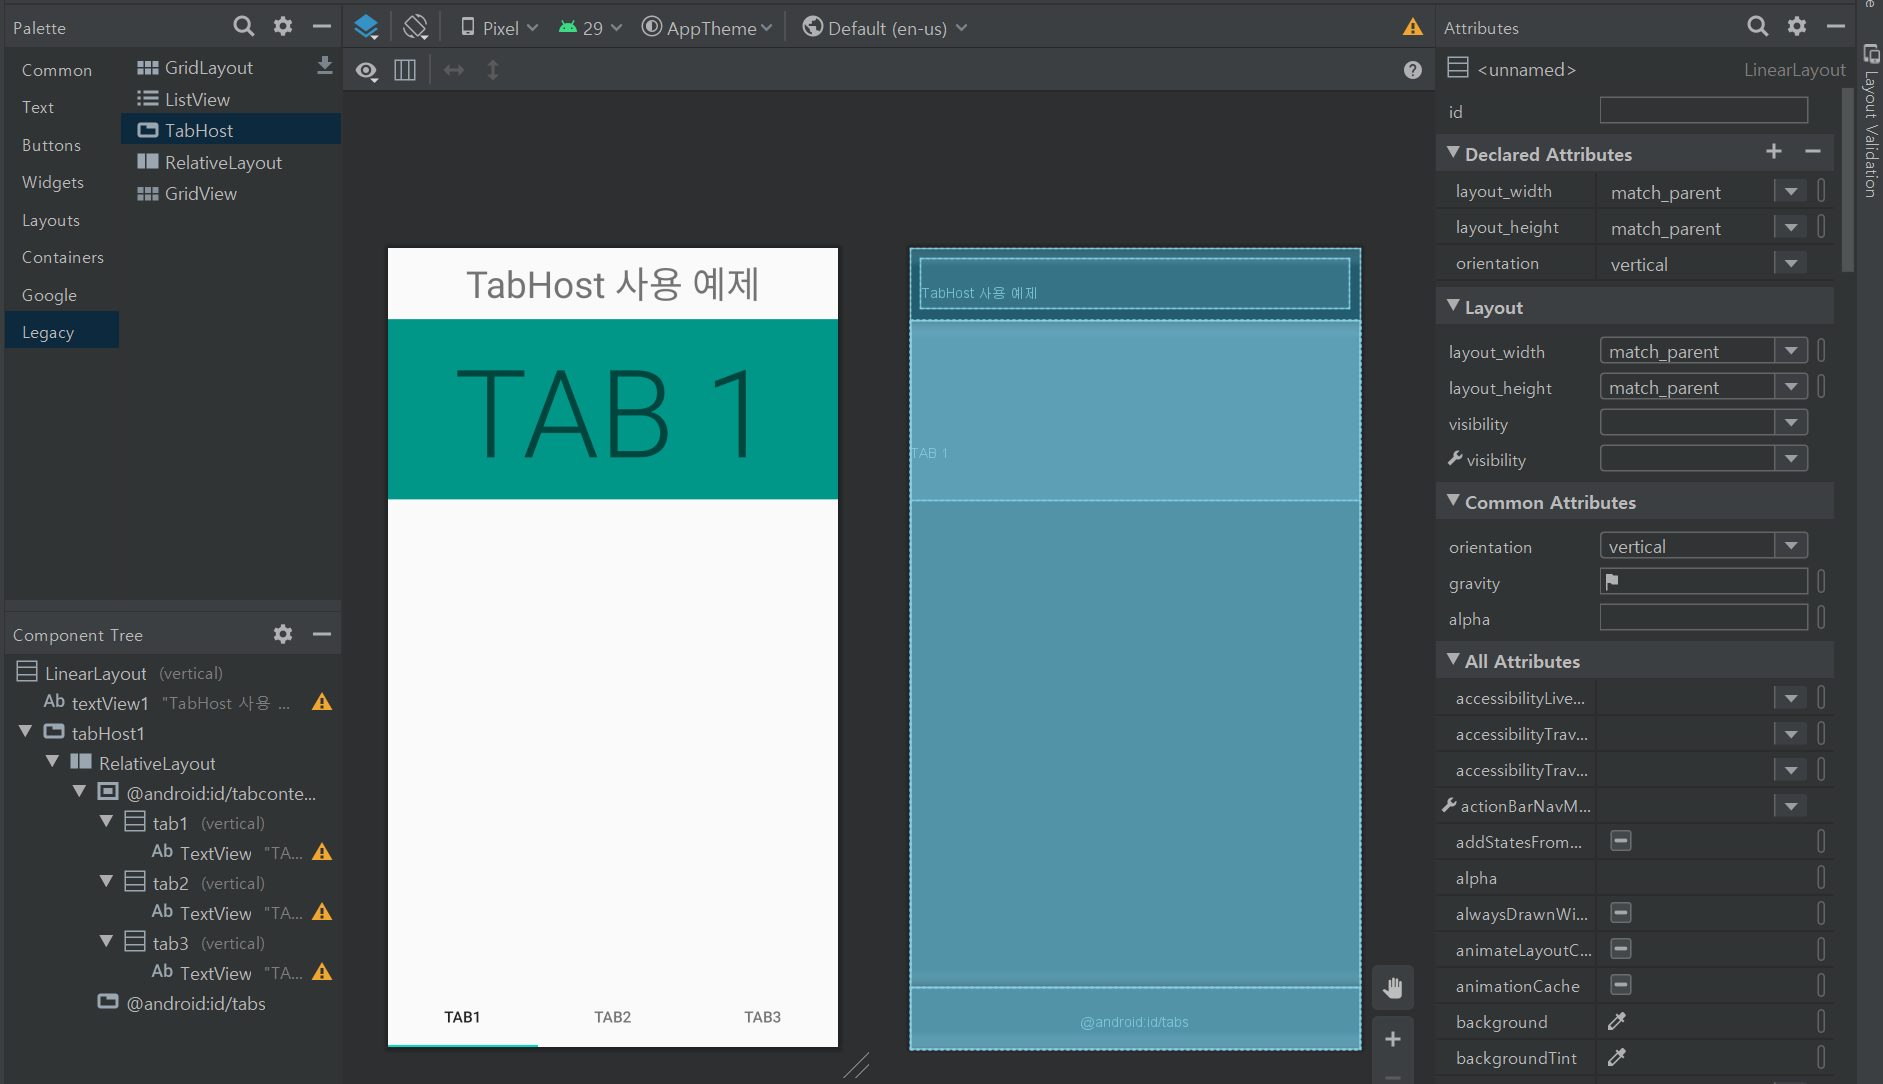
TabHost 사용 방법에 대해 알아봅니다. TabHost라는 용어보다 Tab Layout이라는 용어가 더 이해하기에 유용합니다. 탭호스트(TabHost)는 화면의 상단이나 하단에 여러개의 탭을 배치하고 탭을 클릭하면 사용자에게 보여줍니다. TabHost는 FrameLayout을 확장한 위젯뷰입니다. 아래 예제 코드의 레이아웃 구성에서 볼 수 있듯이 TabWidget를 TabHost가 감싸고 있습니다.
■ TabHost 사용시 주의사항
1. TabWidget의 id 속성값은 반드시 “@android:id/tabs” 값을 지정해야 합니다. 사용자가 정의할 수 없습니다.
2. TabHost 안에 컨텐츠(Contents)를 보여줘야할 경우 FrameLayout을 사용해야 합니다.
[activity_main.xml] 화면 상단에 TAB을 배치할 경우

<?xml version="1.0" encoding="utf-8"?>
<LinearLayout
    xmlns:android="http://schemas.android.com/apk/res/android"
    android:layout_width="match_parent"
    android:layout_height="match_parent"
    android:orientation="vertical">

    <TextView
        android:id="@+id/textView1"
        android:layout_width="match_parent"
        android:layout_height="wrap_content"
        android:layout_margin="10dp"
        android:gravity="center"
        android:text="TabHost 사용 예제"
        android:textAppearance="@style/TextAppearance.AppCompat.Display1" />

    <TabHost
        android:id="@+id/tabHost1"
        android:layout_width="match_parent"
        android:layout_height="wrap_content">

        <LinearLayout
            android:layout_width="match_parent"
            android:layout_height="match_parent"
            android:orientation="vertical">

            <TabWidget
                android:id="@android:id/tabs"
                android:layout_width="match_parent"
                android:layout_height="wrap_content" />

            <FrameLayout
                android:id="@android:id/tabcontent"
                android:layout_width="match_parent"
                android:layout_height="match_parent">

                <LinearLayout
                    android:id="@+id/tab1"
                    android:layout_width="match_parent"
                    android:layout_height="match_parent"
                    android:orientation="vertical">
                    <TextView
                        android:layout_width="match_parent"
                        android:layout_height="wrap_content"
                        android:background="#009688"
                        android:gravity="center"
                        android:padding="8dp"
                        android:text="TAB 1"
                        android:textAppearance="@style/TextAppearance.AppCompat.Display4"/>

                </LinearLayout>

                <LinearLayout
                    android:id="@+id/tab2"
                    android:layout_width="match_parent"
                    android:layout_height="match_parent"
                    android:orientation="vertical">
                    <TextView
                        android:layout_width="match_parent"
                        android:layout_height="wrap_content"
                        android:background="#2196F3"
                        android:gravity="center"
                        android:padding="8dp"
                        android:text="TAB 2"
                        android:textAppearance="@style/TextAppearance.AppCompat.Display4"/>
                </LinearLayout>

                <LinearLayout
                    android:id="@+id/tab3"
                    android:layout_width="match_parent"
                    android:layout_height="match_parent"
                    android:orientation="vertical">

                    <TextView
                        android:layout_width="match_parent"
                        android:layout_height="wrap_content"
                        android:background="#B31D1D"
                        android:gravity="center"
                        android:padding="8dp"
                        android:text="TAB 3"
                        android:textAppearance="@style/TextAppearance.AppCompat.Display4"/>
                </LinearLayout>
            </FrameLayout>
        </LinearLayout>
    </TabHost>

</LinearLayout>
[activity_main.xml] 화면 하단에 TAB을 배치할 경우

<?xml version="1.0" encoding="utf-8"?>
<LinearLayout
    xmlns:android="http://schemas.android.com/apk/res/android"
    android:layout_width="match_parent"
    android:layout_height="match_parent"
    android:orientation="vertical">

    <TextView
        android:id="@+id/textView1"
        android:layout_width="match_parent"
        android:layout_height="wrap_content"
        android:layout_margin="10dp"
        android:gravity="center"
        android:text="TabHost 사용 예제"
        android:textAppearance="@style/TextAppearance.AppCompat.Display1" />

    <TabHost
        android:id="@+id/tabHost1"
        android:layout_width="match_parent"
        android:layout_height="wrap_content">

        <RelativeLayout
            android:layout_width="match_parent"
            android:layout_height="match_parent"
            android:orientation="vertical">
            <FrameLayout
                android:id="@android:id/tabcontent"
                android:layout_width="match_parent"
                android:layout_height="match_parent"
                android:layout_above="@android:id/tabs">

                <LinearLayout
                    android:id="@+id/tab1"
                    android:layout_width="match_parent"
                    android:layout_height="match_parent"
                    android:orientation="vertical">
                    <TextView
                        android:layout_width="match_parent"
                        android:layout_height="wrap_content"
                        android:background="#009688"
                        android:gravity="center"
                        android:padding="8dp"
                        android:text="TAB 1"
                        android:textAppearance="@style/TextAppearance.AppCompat.Display4"/>

                </LinearLayout>

                <LinearLayout
                    android:id="@+id/tab2"
                    android:layout_width="match_parent"
                    android:layout_height="match_parent"
                    android:orientation="vertical">
                    <TextView
                        android:layout_width="match_parent"
                        android:layout_height="wrap_content"
                        android:background="#2196F3"
                        android:gravity="center"
                        android:padding="8dp"
                        android:text="TAB 2"
                        android:textAppearance="@style/TextAppearance.AppCompat.Display4"/>
                </LinearLayout>

                <LinearLayout
                    android:id="@+id/tab3"
                    android:layout_width="match_parent"
                    android:layout_height="match_parent"
                    android:orientation="vertical">

                    <TextView
                        android:layout_width="match_parent"
                        android:layout_height="wrap_content"
                        android:background="#B31D1D"
                        android:gravity="center"
                        android:padding="8dp"
                        android:text="TAB 3"
                        android:textAppearance="@style/TextAppearance.AppCompat.Display4"/>
                </LinearLayout>
            </FrameLayout>

            <TabWidget
                android:id="@android:id/tabs"
                android:layout_width="match_parent"
                android:layout_height="wrap_content"
                android:layout_alignParentBottom="true"/>
        </RelativeLayout>
    </TabHost>

</LinearLayout>
[MainActivity.kt]
package edu.kotlin.study

import android.os.Bundle
import android.widget.TabHost
import androidx.appcompat.app.AppCompatActivity


class MainActivity : AppCompatActivity() {

    override fun onCreate(savedInstanceState: Bundle?) {
        super.onCreate(savedInstanceState)
        setContentView(R.layout.activity_main)

        val tabHost: TabHost = findViewById<TabHost>(R.id.tabHost1)
        tabHost.setup()

        val tab1 = tabHost.newTabSpec("Tab 1")  // 태그(Tag)는 탭 버튼을 식별할 때 사용되는 값
        tab1.setIndicator("전자제품")    // 탭에 표시될 문자열 지정.
        tab1.setContent(R.id.tab1)  //  매핑할 컨텐츠(Layout) 지정.
        tabHost.addTab(tab1)    // TabHost에 탭 추가

        val tab2 = tabHost.newTabSpec("Tab 2")
        tab2.setIndicator("가구")
        tab2.setContent(R.id.tab2)
        tabHost.addTab(tab2)


        val tab3 = tabHost.newTabSpec("Tab 3")
        tab3.setIndicator("도서")
        tab3.setContent(R.id.tab3)
        tabHost.addTab(tab3)

        //최초 선택 탭 지정
        tabHost.currentTab = 0

    }

}
onCreate 메서드에 TabHost 개체를 참조하기 위해 findViewById 메서드를 호출 후 TabHost의 setup()메서드를 호출합니다. setup()메서드를 호출하지않으면 오류가 발생됩니다. 3개의 탭을 추가하기위해 TabHost.TapSpec 클래스를 사용하여 탭을 클릭했을 때 페이지뷰에 대한 정보를 추가합니다. 화면의 탭의 이름으로 표시할 부분은 setIndicator 메서드를 사용하여 지정하고 매핑할 컨텐츠는 setContent 메서드로 지정합니다. TabHost.addTab 메서드를 사용하여 탭을 추가합니다.
TabHost의 초기 선택 탭을 변경하고자 할 경우 setCurrentTab 메서드를 사용합니다.
[build.gradle(Module:app)]
apply plugin: 'com.android.application'
apply plugin: 'kotlin-android'
apply plugin: 'kotlin-android-extensions'

android {
    compileSdkVersion 29

    defaultConfig {
        applicationId "edu.kotlin.study"
        minSdkVersion 22
        targetSdkVersion 29
        versionCode 1
        versionName "1.0"

        testInstrumentationRunner "androidx.test.runner.AndroidJUnitRunner"
    }

    buildTypes {
        release {
            minifyEnabled false
            proguardFiles getDefaultProguardFile('proguard-android-optimize.txt'), 'proguard-rules.pro'
        }
    }
}

dependencies {
    implementation fileTree(dir: "libs", include: ["*.jar"])
    implementation "org.jetbrains.kotlin:kotlin-stdlib:$kotlin_version"
    implementation 'androidx.core:core-ktx:1.3.1'
    implementation 'androidx.appcompat:appcompat:1.2.0'
    implementation 'androidx.constraintlayout:constraintlayout:2.0.1'
    implementation 'androidx.legacy:legacy-support-v4:1.0.0'
    testImplementation 'junit:junit:4.12'
    androidTestImplementation 'androidx.test.ext:junit:1.1.2'
    androidTestImplementation 'androidx.test.espresso:espresso-core:3.3.0'

}
[build.gradle(Project)]
// Top-level build file where you can add configuration options common to all sub-projects/modules.
buildscript {
    ext.kotlin_version = "1.3.72"
    repositories {
        google()
        jcenter()
    }
    dependencies {
        classpath "com.android.tools.build:gradle:4.0.1"
        classpath "org.jetbrains.kotlin:kotlin-gradle-plugin:$kotlin_version"

        // NOTE: Do not place your application dependencies here; they belong
        // in the individual module build.gradle files
    }
}

allprojects {
    repositories {
        google()
        jcenter()
    }
}

task clean(type: Delete) {
    delete rootProject.buildDir
}
[연관 자료]


