안드로이드 스튜디오 코틀린 프로젝트 생성방법
코틀린 프로젝트 생성 순서
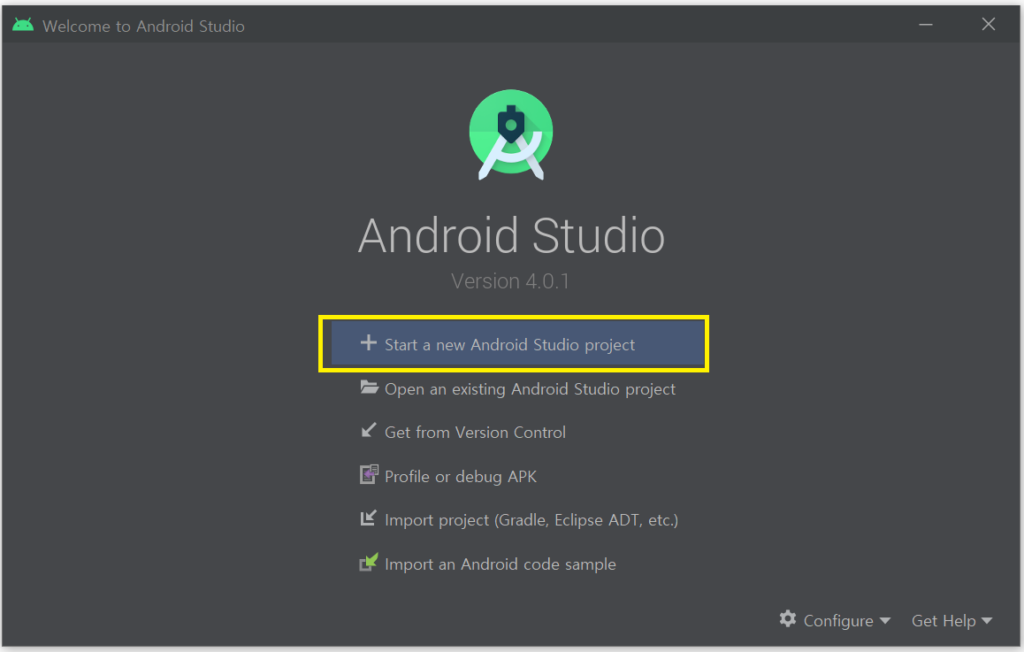
1. Start a new Android Studio project 를 클릭합니다.
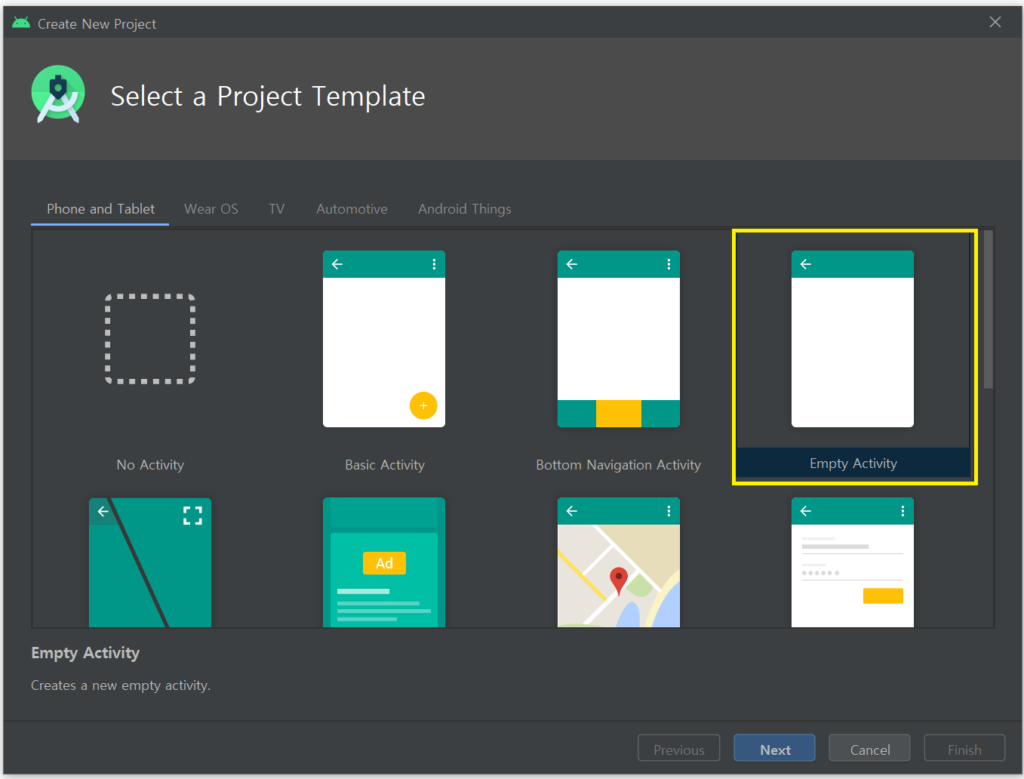
2. 프로젝트 템플릿을 선택한다. (가장 기본적인 Empty Activity)를 선택 후 Next 버튼을 클릭합니다.
3. 프로젝트에 대한 정보를 구성합니다. 프로젝트 이름, 패키지 이름, 저장 위치, 개발 언어 등을 선택 후 Finish버튼을 클릭합니다.( 개발 언어는 Kotlin을 선택합니다.)
■ 스크린샷을 보며 따라하기
안드로이드 스튜디오를 다운 받아 설치 후 실행하면 아래와 같은 팝업창이 노출됩니다.
1. Start a new Android Studio project 를 클릭합니다.
2. 프로젝트 템플릿을 선택한다. (가장 기본적인 Empty Activity)를 선택 후 Next 버튼을 클릭합니다. 자바 프로젝트를 생성 하든 코틀린프로젝트를 생성하든 탬플릿 선택하는 화면은 동일합니다.
3. 프로젝트에 대한 정보를 구성합니다. 프로젝트 이름, 패키지 이름, 저장 위치, 개발 언어 등을 선택 후 Finish버튼을 클릭합니다.( 개발 언어는 Kotlin을 선택합니다.)

생성이 완료되었습니다. 이제 개발을 시작하면 되요. 그에 앞서 프로젝트 구성을 살펴 봅니다.

프로젝트 구성을 살펴보니, 기존 Java 언어로 개발했던 구성과 동일합니다. 다른점은 MainActivity 클래스를 살펴보니 파일 확장자가 java에서 kt로 변경되었습니다. 이동통신 KT가 연상되는 이유는 뭘까요ㅎㅎ 큰 변화가 없어서 코틀린 언어 시작의 거부감은 해소되었네요.
■build.gradle(Module:app) 파일을 살펴 봅니다.
apply plugin: 'com.android.application'
apply plugin: 'kotlin-android'
apply plugin: 'kotlin-android-extensions'

android {
    compileSdkVersion 29

    defaultConfig {
        applicationId "edu.kotlin.study"
        minSdkVersion 22
        targetSdkVersion 29
        versionCode 1
        versionName "1.0"

        testInstrumentationRunner "androidx.test.runner.AndroidJUnitRunner"
    }

    buildTypes {
        release {
            minifyEnabled false
            proguardFiles getDefaultProguardFile('proguard-android-optimize.txt'), 'proguard-rules.pro'
        }
    }
}

dependencies {
    implementation fileTree(dir: "libs", include: ["*.jar"])
    implementation "org.jetbrains.kotlin:kotlin-stdlib:$kotlin_version"
    implementation 'androidx.core:core-ktx:1.3.1'
    implementation 'androidx.appcompat:appcompat:1.2.0'
    implementation 'androidx.constraintlayout:constraintlayout:2.0.1'
    testImplementation 'junit:junit:4.12'
    androidTestImplementation 'androidx.test.ext:junit:1.1.2'
    androidTestImplementation 'androidx.test.espresso:espresso-core:3.3.0'

}
kotlin 플러그인이 추가되었네요. 위에서 2번째 줄과 3번째 줄에 Kotlin 플로그인이 추가되었습니다. 그리고 라이브러리에 java 대신 코틀린 관련 라이브러리 2개가 추가되었습니다.
implementation “org.jetbrains.kotlin:kotlin-stdlib:$kotlin_version”
implementation ‘androidx.core:core-ktx:1.3.1’
이것 외에는 자바와 동일합니다.
■bulid.gradle(project..) 파일을 살펴봅니다.
// Top-level build file where you can add configuration options common to all sub-projects/modules.
buildscript {
    ext.kotlin_version = "1.3.72"
    repositories {
        google()
        jcenter()
    }
    dependencies {
        classpath "com.android.tools.build:gradle:4.0.1"
        classpath "org.jetbrains.kotlin:kotlin-gradle-plugin:$kotlin_version"

        // NOTE: Do not place your application dependencies here; they belong
        // in the individual module build.gradle files
    }
}

allprojects {
    repositories {
        google()
        jcenter()
    }
}

task clean(type: Delete) {
    delete rootProject.buildDir
}
java와 차이점은 classpath에 “org.jetbrains.kotlin:kotlin-gradle-plugin:$kotlin_version”이 추가 되었습니다.
■gradle.properties 파일을 살펴봅니다.
# Project-wide Gradle settings.
# IDE (e.g. Android Studio) users:
# Gradle settings configured through the IDE *will override*
# any settings specified in this file.
# For more details on how to configure your build environment visit
# http://www.gradle.org/docs/current/userguide/build_environment.html
# Specifies the JVM arguments used for the daemon process.
# The setting is particularly useful for tweaking memory settings.
org.gradle.jvmargs=-Xmx2048m
# When configured, Gradle will run in incubating parallel mode.
# This option should only be used with decoupled projects. More details, visit
# http://www.gradle.org/docs/current/userguide/multi_project_builds.html#sec:decoupled_projects
# org.gradle.parallel=true
# AndroidX package structure to make it clearer which packages are bundled with the
# Android operating system, and which are packaged with your app"s APK
# https://developer.android.com/topic/libraries/support-library/androidx-rn
android.useAndroidX=true
# Automatically convert third-party libraries to use AndroidX
android.enableJetifier=true
# Kotlin code style for this project: "official" or "obsolete":
kotlin.code.style=official
코틀린 관련하여 한 줄이 추가 되었네요. kotlin.code.style=official
official과 obsolete 중에 설정이 가능합니다. gradle.properties파일에서 직접 변경하나 안드로이드 스튜디오에서 지원하는 메뉴을 통한 설정UI를 사용하여 변경이 가능합니다.
■개발환경 : 안드로이드 스튜디오 4.0.1
안드로이드 스튜디오 4.0.1버전을 사용중이라면, IntelliJ 관련하여 별도의 플러그인을 설치할 필요는 없습니다. 이미 설치가 완료되어 있습니다. 설치가 되어 있지 않다면 안드로이드 스튜디오 상단 메뉴에서 File – Settings – Plugins 선택 후 kotlin으로 검색하여 설치버튼을 눌러 설치하세요.