깃허브 원격 저장소(GitHub Repository)에 소스 커밋(commit) 하는 방법, push하는 방법
원격저장소에 Git CLI (Command LIne Interface) 기반인 Git Bash를 프로그램을 사용하여 소스코드를 깃허브 레파지토리에 Push하는 방법에 대해 알아봅니다. 원격저장소 생성및 삭제 방법은 아래 글을 참고하세요. 깃허브 원격 저장소(GitHub Repository) 생성 및 삭제 방법
깃허브 원격 저장소(GitHub Repository) 생성 및 삭제 방법
이번포스팅은 원격저장소에 Git CLI (Command LIne Interface) 기반인 Git Bash를 프로그램을 사용하여 소스코드를 Push하는 방법에 대해 알아봅니다. 원격저장소로 GitHub를 사용해봅니다. 깃허브는 개발자
playground.naragara.com
원격저장소(Remote repository)에 소스를 올려봅시다.
원격저장소를 만들었으면 이제 git 로컬저장소와 원격저장소를 연결하는 설정을 해야합니다.
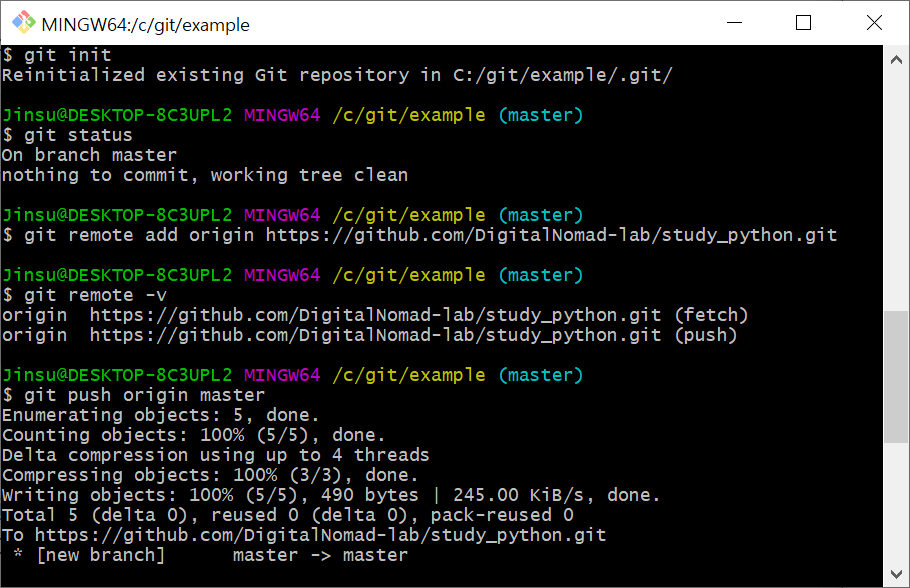
git remote add origin [https 레파지토리 주소] 명령어를 사용하여 추가합니다.
git remote add origin https://github.com/DigitalNomad-lab/study_python.git그런 다음 git remote -v 명령어를 실행해주면 로컬저장소와 원격저장소 연결됩니다.
Jinsu@DESKTOP-8C3UPL2 MINGW64 /c/git/example (master)
$ git remote add origin https://github.com/DigitalNomad-lab/study_python.git

Jinsu@DESKTOP-8C3UPL2 MINGW64 /c/git/example (master)
$ git remote -v
origin  https://github.com/DigitalNomad-lab/study_python.git (fetch)
origin  https://github.com/DigitalNomad-lab/study_python.git (push)
이제 원격 저장소에 커밋해봅니다.
git push origin master 명령어를 실행합니다. [Git] 깃 저장소(Git Repository) 생성 및 Git 사용 방법 총정리글에서 테스트로 로컬저장소에 commit했던 파일들이 원격저장소로 올라가게 됩니다. 처음 시도할 경우 GitHub Sign in 팝업창이 뜨는데 Sign in with your browser를 클릭 후 깃 패스워드를 입력해주면 해결됩니다.
Jinsu@DESKTOP-8C3UPL2 MINGW64 /c/git/example (master)
$ git push origin master
Enumerating objects: 5, done.
Counting objects: 100% (5/5), done.
Delta compression using up to 4 threads
Compressing objects: 100% (3/3), done.
Writing objects: 100% (5/5), 490 bytes | 245.00 KiB/s, done.
Total 5 (delta 0), reused 0 (delta 0), pack-reused 0
To https://github.com/DigitalNomad-lab/study_python.git
 * [new branch]      master -> master

Jinsu@DESKTOP-8C3UPL2 MINGW64 /c/git/example (master)
$

다음은 Git Bash작업 기록입니다.

Git : Remote origin already exists 오류 발생시 해결 방법
이미 원격저장소를 연결한경우 발생되는 오류입니다. 이런 경우 git remote remove origin 명령어를 실행하여 기존에 연결되어 있는 원격저장소 연결을 해제합니다. 그런 다음 다시 위에서 사용했던 명령어를 동일하게 순서대로 실행하여 새로운 원격저장소를 연결해줍니다.
 git remote add origin https://github.com/DigitalNomad-lab/study_python.git

 git remote -v
[관련 글 더 보기]
[Git] 깃 저장소(Git Repository) 생성 및 Git 사용 방법 총정리
[Git] 깃 저장소(Git Repository) 생성 및 Git 사용 방법 총정리
Git을 사용하기위해 Git 저장소를 생성해야합니다. 우리가 인터넷에서 파일을 다운로드 받을때 다운 받은 파일이 저장되는 디렉토리(폴더)가 있습니다. 보통 윈도우의 경우 C:UsersilikeDownloads 와
playground.naragara.com
[Git] 윈도우용 Git 설치 방법 따라하기 및 Git 환경 설정 방법 알아보기
[Git] 윈도우용 Git 설치 방법 따라하기 및 Git 환경 설정 방법 알아보기
PC에서 Git을 사용하기 위해 윈도우 버전(Git for Windows)의 Git을 설치하는 방법에 대해 알아봅니다. Git은 소스 코드의 형상관리(버전관리)를 위해 사용하는 저장소라고 생각하시면 이해하기 쉽습니
playground.naragara.com


