[android : kotlin] 코틀린 RecyclerView 아이템 추가 및 삭제하는 방법
리사이클러뷰(RecyclerView)에 아이템을 추가 및 삭제하는 방법에 대해 알아보자
리사이클러뷰(RecyclerView)에 대한 기본적인 사용방법은 아래 포스팅을 참고 하자.
위에 포스팅했던 레이아웃인 메인액티비티(activity_main.xml)에 추가 버튼과 삭제 버튼을 추가하였다.
<?xml version="1.0" encoding="utf-8"?>
<RelativeLayout
    xmlns:android="http://schemas.android.com/apk/res/android"
    android:layout_width="match_parent"
    android:layout_height="match_parent"
    android:orientation="vertical">

    <TextView
        android:id="@+id/textView1"
        android:layout_width="match_parent"
        android:layout_height="wrap_content"
        android:layout_margin="10dp"
        android:gravity="center"
        android:text="RecyclerView 예제"
        android:textAppearance="@style/TextAppearance.AppCompat.Display1" />

    <androidx.recyclerview.widget.RecyclerView
        android:id="@+id/recycler_view"
        android:layout_below="@+id/textView1"
        android:layout_width="match_parent"
        android:layout_height="match_parent"
        android:layout_above="@+id/bottom_layout"/>

    <LinearLayout
        android:id="@+id/bottom_layout"
        android:layout_width="match_parent"
        android:layout_height="wrap_content"
        android:layout_alignParentBottom="true"
        android:layout_margin="10dp"
        android:orientation="horizontal">

        <Button
            android:id="@+id/del_btn"
            android:layout_width="wrap_content"
            android:layout_height="wrap_content"
            android:layout_weight="1"
            android:text="삭제" />

        <Button
            android:id="@+id/add_btn"
            android:layout_width="wrap_content"
            android:layout_height="wrap_content"
            android:layout_weight="1"
            android:text="추가" />
    </LinearLayout>

</RelativeLayout>
리사이클러뷰에서 사용될 아이템뷰 레이아웃(view_item_layout.xml)은 기존과 동일하다.
<?xml version="1.0" encoding="utf-8"?>
<androidx.constraintlayout.widget.ConstraintLayout
xmlns:android="http://schemas.android.com/apk/res/android"
    android:layout_width="match_parent"
    android:layout_height="60dp"
    xmlns:app="http://schemas.android.com/apk/res-auto"
    xmlns:tools="http://schemas.android.com/tools"
    android:background="@color/colorAccent"
    android:layout_margin="5dp">

    <ImageView
        android:id="@+id/userImg"
        android:layout_width="54dp"
        android:layout_height="54dp"
        android:layout_marginBottom="4dp"
        android:layout_marginStart="8dp"
        android:layout_marginTop="4dp"
        app:layout_constraintBottom_toBottomOf="parent"
        app:layout_constraintStart_toStartOf="parent"
        app:layout_constraintTop_toTopOf="parent"
        app:srcCompat="@mipmap/ic_launcher_round" />

    <TextView
        android:id="@+id/userNameTxt"
        android:layout_width="wrap_content"
        android:layout_height="wrap_content"
        android:layout_marginStart="15dp"
        android:textSize="20sp"
        android:textStyle="bold"
        app:layout_constraintStart_toEndOf="@+id/userImg"
        app:layout_constraintTop_toTopOf="@+id/userImg"
        tools:text="홍길동"/>

    <TextView
        android:id="@+id/payTxt"
        android:layout_width="wrap_content"
        android:layout_height="wrap_content"
        android:textSize="17sp"
        app:layout_constraintBottom_toBottomOf="@+id/userImg"
        app:layout_constraintStart_toStartOf="@+id/userNameTxt"
        tools:text="연봉" />

    <TextView
        android:id="@+id/addressTxt"
        android:layout_width="wrap_content"
        android:layout_height="wrap_content"
        android:layout_marginStart="15dp"
        android:textSize="17sp"
        app:layout_constraintBottom_toBottomOf="@+id/payTxt"
        app:layout_constraintStart_toEndOf="@+id/payTxt"
        app:layout_constraintTop_toTopOf="@+id/payTxt"
        tools:text="주소" />

</androidx.constraintlayout.widget.ConstraintLayout>
Value Object 역시 동일하다.
package edu.kotlin.study

/*dataVo.kt*/
class DataVo(val name: String, val id: String, val address: String, val pay: Int, val photo: String)
위 포스트에서 작성했던 리사이클러뷰 어댑터에 현재 클릭한 위치의 position 값을 컨트롤 할 수 있도록 메서드 2개를 추가하였다. 그리고 아이템 추가 및 삭제 메서드를 추가하였다. 그리고 onBindViewHolder 메서드를 오버라이드 하는 부분에 setOnClickListener() 메서드를 클릭했을 때 클릭한 아이템의 position를 set 하는 메서드 setPosition()를 호출하였다.
데이터를 신규 추가하거나 삭제한 경우 반드시 notifyDataSetChanged()메소드를 호출하여 adapter에게 값이 변경되었음을 알려주어야 리사이클러뷰가 갱신됨을 잊지 말아야 한다.
    var mPosition = 0


    fun getPosition(): Int {
        return mPosition
    }

    fun setPosition(position: Int) {
        mPosition = position
    }

    fun addItem(dataVo: DataVo) {
        dataList.add(dataVo)
        //갱신처리 반드시 해야함
        notifyDataSetChanged()
    }

    fun removeItem(position: Int) {
        if (position > 0) {
            dataList.removeAt(position)
            //notifyItemRemoved(position)
            //갱신처리 반드시 해야함
            notifyDataSetChanged()
        }
    }


    override fun onBindViewHolder(holder: ItemViewHolder, position: Int) {
        holder.bind(dataList[position], context)
        holder.itemView.setOnClickListener { view ->
            setPosition(position)
            //Toast.makeText(view.context, "$position 아이템 클릭!", Toast.LENGTH_SHORT).show()
        }
    }
리사이클러뷰 CustomAdapter.kt 전에 코드 내용은 아래와 같다.
package edu.kotlin.study

import android.content.Context
import android.view.LayoutInflater
import android.view.View
import android.view.ViewGroup
import android.widget.ImageView
import android.widget.TextView
import android.widget.Toast
import androidx.recyclerview.widget.RecyclerView

class CustomAdapter(
    private val context: Context, private val dataList: ArrayList<DataVo>
) : RecyclerView.Adapter<CustomAdapter.ItemViewHolder>() {

    var mPosition = 0

    fun getPosition(): Int {
        return mPosition
    }

    fun setPosition(position: Int) {
        mPosition = position
    }

    fun addItem(dataVo: DataVo) {
        dataList.add(dataVo)
        //갱신처리 반드시 해야함
        notifyDataSetChanged()
    }

    fun removeItem(position: Int) {
        if (position > 0) {
            dataList.removeAt(position)
            //notifyItemRemoved(position)
            //갱신처리 반드시 해야함
            notifyDataSetChanged()
        }
    }

    inner class ItemViewHolder(itemView: View) :
        RecyclerView.ViewHolder(itemView) {


        private val userPhoto = itemView.findViewById<ImageView>(R.id.userImg)
        private val userName = itemView.findViewById<TextView>(R.id.userNameTxt)
        private val userPay = itemView.findViewById<TextView>(R.id.payTxt)
        private val userAddress: TextView = itemView.findViewById<TextView>(R.id.addressTxt)

        fun bind(dataVo: DataVo, context: Context) {
            if (dataVo.photo != "") {
                val resourceId =
                    context.resources.getIdentifier(dataVo.photo, "drawable", context.packageName)

                if (resourceId > 0) {
                    userPhoto.setImageResource(resourceId)
                } else {
                    userPhoto.setImageResource(R.mipmap.ic_launcher_round)
                }
            } else {
                userPhoto.setImageResource(R.mipmap.ic_launcher_round)
            }

            //TextView에 데이터 세팅
            userName.text = dataVo.name
            userPay.text = dataVo.pay.toString()
            userAddress.text = dataVo.address
        }
    }

    override fun onCreateViewHolder(parent: ViewGroup, viewType: Int): ItemViewHolder {
        val view = LayoutInflater.from(context).inflate(R.layout.view_item_layout, parent, false)
        return ItemViewHolder(view)
    }

    override fun onBindViewHolder(holder: ItemViewHolder, position: Int) {
        holder.bind(dataList[position], context)
        holder.itemView.setOnClickListener { view ->
            setPosition(position)
           // Toast.makeText(view.context, "$position 아이템 클릭!", Toast.LENGTH_SHORT).show()
        }
    }

    override fun getItemCount(): Int {
        return dataList.size
    }
}
메인액티비티클래스(MainActivity.kt)에 추가 버튼 및 삭제 버튼에 대한 이벤트 처리를 하였다.
package edu.kotlin.study

import android.media.MediaPlayer
import android.net.Uri
import android.os.Bundle
import androidx.appcompat.app.AppCompatActivity
import androidx.recyclerview.widget.LinearLayoutManager
import kotlinx.android.synthetic.main.activity_main.*


class MainActivity : AppCompatActivity() {

    var userList = arrayListOf<DataVo>(
        DataVo("염심이", "test4", "의정부", 20000000, ""),
        DataVo("IU", "test1", "전주시", 30000000,"user_img_01"),
        DataVo("홍길동", "test2", "서울시",10000000, "user_img_02"),
        DataVo("김영수", "test3", "광주시", 20000000, "user_img_03")
    )

    override fun onCreate(savedInstanceState: Bundle?) {
        super.onCreate(savedInstanceState)
        setContentView(R.layout.activity_main)

        val mAdapter = CustomAdapter(this, userList)
        recycler_view.adapter = mAdapter


        val layout = LinearLayoutManager(this)
        recycler_view.layoutManager = layout
        recycler_view.setHasFixedSize(true)

        add_btn.setOnClickListener {
            mAdapter.addItem(DataVo("아무개", "test14", "광주시", 32000000, "user_img_03"))
            // notifyDataSetChanged를 호출하여 adapter의 값이 변경되었다는 것을 알려준다.
            // 어댑터 안에서 처리했음으로 주석처리하였다.
            //mAdapter.notifyDataSetChanged()
        }

        del_btn.setOnClickListener {
            mAdapter.removeItem(mAdapter.getPosition())
            // notifyDataSetChanged를 호출하여 adapter의 값이 변경되었다는 것을 알려준다.
            //mAdapter.notifyDataSetChanged()
        }

}
[build.gradle(Module:app)]
apply plugin: 'com.android.application'
apply plugin: 'kotlin-android'
apply plugin: 'kotlin-android-extensions'

android {
    compileSdkVersion 29

    defaultConfig {
        applicationId "edu.kotlin.study"
        minSdkVersion 22
        targetSdkVersion 29
        versionCode 1
        versionName "1.0"

        testInstrumentationRunner "androidx.test.runner.AndroidJUnitRunner"
    }

    buildTypes {
        release {
            minifyEnabled false
            proguardFiles getDefaultProguardFile('proguard-android-optimize.txt'), 'proguard-rules.pro'
        }
    }
}

dependencies {
    implementation fileTree(dir: "libs", include: ["*.jar"])
    implementation "org.jetbrains.kotlin:kotlin-stdlib:$kotlin_version"
    implementation 'androidx.core:core-ktx:1.3.1'
    implementation 'androidx.appcompat:appcompat:1.2.0'
    implementation 'androidx.constraintlayout:constraintlayout:2.0.1'
    implementation 'androidx.legacy:legacy-support-v4:1.0.0'
    implementation 'androidx.recyclerview:recyclerview:1.1.0'
    testImplementation 'junit:junit:4.12'
    androidTestImplementation 'androidx.test.ext:junit:1.1.2'
    androidTestImplementation 'androidx.test.espresso:espresso-core:3.3.0'

}
[build.gradle(Project)]
// Top-level build file where you can add configuration options common to all sub-projects/modules.
buildscript {
    ext.kotlin_version = "1.3.72"
    repositories {
        google()
        jcenter()
    }
    dependencies {
        classpath "com.android.tools.build:gradle:4.0.1"
        classpath "org.jetbrains.kotlin:kotlin-gradle-plugin:$kotlin_version"

        // NOTE: Do not place your application dependencies here; they belong
        // in the individual module build.gradle files
    }
}

allprojects {
    repositories {
        google()
        jcenter()
    }
}

task clean(type: Delete) {
    delete rootProject.buildDir
}
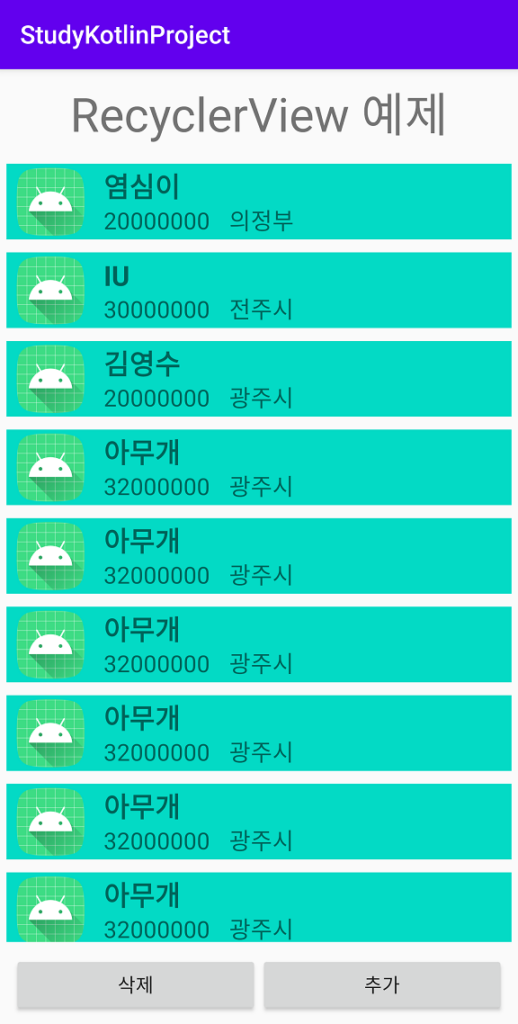
실행화면
[REFERENCE]
[코틀린 더 알아보기]
[android : kotlin] 코틀린 JSON파싱(JSONObject, JSONArray) 방법 및 예제
[android : kotlin] 코틀린 자료형 검사 : is , Any, as? 키워드 사용하기 & 사용 예시