[android : kotlin] 코틀린 RecyclerView 와 Staggered Grid를 함께 사용하는 방법 및 예제 (StaggeredGridLayoutManager)
리사이클러뷰(RecyclerView)는 리스트뷰(ListView)와 사용목적과 동작 방식이 매우 유사합니다. 하지만 리스트뷰의 단점을 보완하였습니다. 그래서 개인적인 생각인데 리스트뷰를 쓰는 일은 이제 없을 것으로 생각합니다. RecyclerView는 많은 데이터를 불러와 표시하여도 메모리 부족에 따른 프로그램 강제 종료의 상황은 발생하지 않습니다. 리스트뷰를 사용시 스크롤을 내리다 보면 화면이 버벅거리는 현상이 발생하지만 리사이클러뷰는 이런 현상이 나타나지 않으며 매끄럽습니다. 그만큼 리스트뷰를 써야할 이유가 없어졌다고 봅니다. RecyclerView를 만들기 위해서는 RecyclerView 레이아웃과 RecyclerView의 ItemView, Adapter, Value Obejct 클래스 등 총 4 가지가 필요합니다.
StaggeredGridLayoutManager를 사용하여 RecyclerView 구현방법
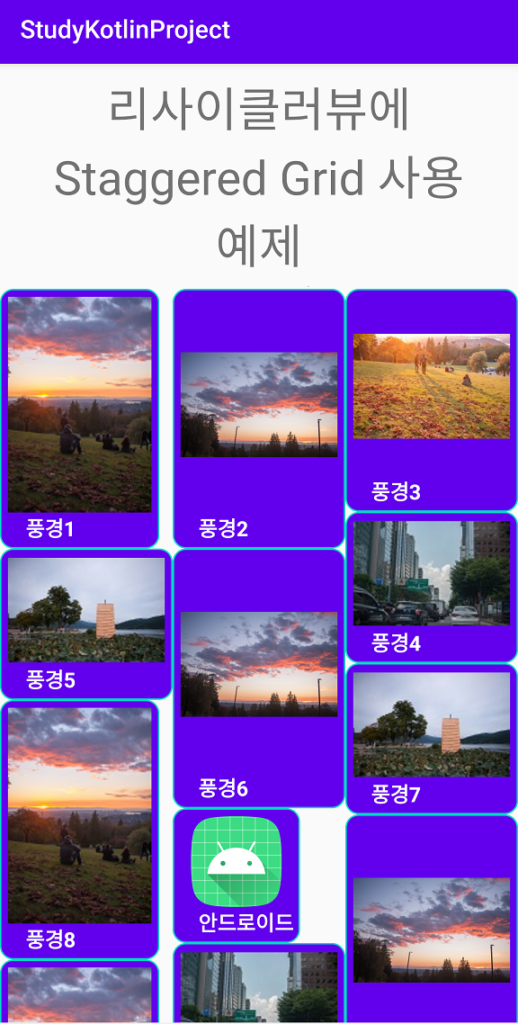
이번에는 LinearLayoutManager를 사용하지 않고 StaggeredGridLayoutManager를 사용하여 리사이클러뷰에 설정하여 사용해보겠습니다. 간단히 말해서 RecyclerView를 Staggered Grid로 표시하기 위해 GridLayoutManager를 사용하는 것입니다. StaggeredGridLayoutManager는 GridLayoutManager와 유사하지만 높이와 너비에 따라 항목을 자동으로 설정합니다.
앱을 실행하면 아래와 같은 화면을 볼 수 있습니다. 그럼 이제 만들어볼까요?
[스탭1] 리사이클러뷰를 사용하기위해 build.gradle(Module:app)파일을 열고 아래 라이브러리를 추가합니다.
dependencies {
   ...............
   implementation 'androidx.recyclerview:recyclerview:1.1.0'
}
[스탭2] 메인액티비티(activity_main.xml)에 리사이클러뷰를 추가한다. androidx.recyclerview.widget.RecyclerView을 사용하였습니다.
<?xml version="1.0" encoding="utf-8"?>
<RelativeLayout
    xmlns:android="http://schemas.android.com/apk/res/android"
    android:layout_width="match_parent"
    android:layout_height="match_parent"
    android:orientation="vertical">

    <TextView
        android:id="@+id/textView1"
        android:layout_width="match_parent"
        android:layout_height="wrap_content"
        android:layout_margin="10dp"
        android:gravity="center"
        android:text="리사이클러뷰에 그리드 레이아웃 사용 예제"
        android:textAppearance="@style/TextAppearance.AppCompat.Display1" />

    <androidx.recyclerview.widget.RecyclerView
        android:id="@+id/recycler_view"
        android:layout_below="@+id/textView1"
        android:layout_width="match_parent"
        android:layout_height="match_parent" />

</RelativeLayout>
[스탭3] 리사이클러뷰에서 사용될 아이템뷰 레이아웃(view_item_layout.xml)을 추가합니다.
<?xml version="1.0" encoding="utf-8"?>
<LinearLayout xmlns:android="http://schemas.android.com/apk/res/android"
    android:layout_width="wrap_content"
    android:layout_height="wrap_content"
    xmlns:app="http://schemas.android.com/apk/res-auto"
    android:background="@drawable/item_layout_shape"
    android:orientation="vertical"
    android:padding="5dp">

    <ImageView
        android:id="@+id/userImg"
        android:layout_width="match_parent"
        android:layout_height="match_parent"
        android:layout_margin="1dp"
        app:srcCompat="@mipmap/ic_launcher_round" />
    <LinearLayout
        android:layout_width="match_parent"
        android:layout_height="match_parent"
        android:orientation="horizontal">
        <TextView
            android:id="@+id/userNameTxt"
            android:layout_width="wrap_content"
            android:layout_height="wrap_content"
            android:layout_marginStart="15dp"
            android:textSize="15sp"
            android:textStyle="bold"
            android:textColor="#FFFFFFFF" />

        <TextView
            android:id="@+id/payTxt"
            android:layout_width="wrap_content"
            android:layout_height="wrap_content"
            android:textSize="15sp"
            android:visibility="gone"
            android:textColor="#FFFFFFFF"  />

        <TextView
            android:id="@+id/addressTxt"
            android:layout_width="wrap_content"
            android:layout_height="wrap_content"
            android:layout_marginStart="15dp"
            android:visibility="gone"
            android:textSize="15sp"
            android:textColor="#FFFFFFFF"  />
    </LinearLayout>
</LinearLayout>
[별도] Drawable 폴더에 drawable 파일을 생성 합니다. 파일 이름은 item_layout_shape.xml로 지정하였습니다. 레이아웃 모양에 변화를 주기 위해 커스텀 처리 합니다.
<?xml version="1.0" encoding="utf-8"?>
<shape xmlns:android="http://schemas.android.com/apk/res/android" android:shape="rectangle" >
    <corners
        android:radius="10dp"
        />
    <solid
        android:color="@color/colorPrimary"
        />
    <padding
        android:left="0dp"
        android:top="0dp"
        android:right="0dp"
        android:bottom="0dp"
        />
    <stroke
        android:width="1dp"
        android:color="@color/colorAccent"
        />
</shape>
안드로이드 스튜디오 메뉴를 사용한 생성방법은 아래글을 참고하세요.
[스탭4] Value Object를 생성하자. 리스트 레이아웃에 뿌려줄 데이터를 담아놓은 클래스를 만듭니다. 별도의 클래스 파일로 생성하였습니다.
package edu.kotlin.study

/*dataVo.kt*/
class DataVo(val name: String, val id: String, val address: String, val pay: Int, val photo: String)
[스탭5] 리사이클러뷰 어댑터 클래스를 만듭니다. RecyclerView.Adapter를 확장하여 생성합니다.
onCreateViewHolder(), onBindViewHolder(), getItemCount() 3개의 메서드를 필수로 오버라이드 하여 처리합니다.
onCreateViewHolder() 메서드는 화면을 최초 로딩하여 만들어진 View가 없는 경우 레이아웃을 inflate하여 ViewHolder를 생성합니다. onBindViewHolder() 메서드에서는 layout의 view와 데이터를 연결합니다. getItemCount() 메서드는 아이템 갯수를 리턴처리 합니다.
package edu.kotlin.study

import android.content.Context
import android.content.Intent
import android.view.LayoutInflater
import android.view.View
import android.view.ViewGroup
import android.widget.ImageView
import android.widget.TextView
import android.widget.Toast
import androidx.recyclerview.widget.RecyclerView


class CustomAdapter(
    private val context: Context, private val dataList: ArrayList<DataVo>
) : RecyclerView.Adapter<CustomAdapter.ItemViewHolder>() {

    var mPosition = 0


    inner class ItemViewHolder(itemView: View) :
        RecyclerView.ViewHolder(itemView) {

        private val userPhoto = itemView.findViewById<ImageView>(R.id.userImg)
        private val userName = itemView.findViewById<TextView>(R.id.userNameTxt)
        private val userPay = itemView.findViewById<TextView>(R.id.payTxt)
        private val userAddress: TextView = itemView.findViewById<TextView>(R.id.addressTxt)

        fun bind(dataVo: DataVo, context: Context) {
            if (dataVo.photo != "") {
                val resourceId =
                    context.resources.getIdentifier(dataVo.photo, "drawable", context.packageName)

                if (resourceId > 0) {
                    userPhoto.setImageResource(resourceId)
                } else {
                    userPhoto.setImageResource(R.mipmap.ic_launcher_round)
                }
            } else {
                userPhoto.setImageResource(R.mipmap.ic_launcher_round)
            }

            //TextView에 데이터 세팅
            userName.text = dataVo.name
            userPay.text = dataVo.pay.toString()
            userAddress.text = dataVo.address
        }
    }

    override fun onCreateViewHolder(parent: ViewGroup, viewType: Int): ItemViewHolder {
        val view = LayoutInflater.from(context).inflate(R.layout.view_item_layout, parent, false)
        return ItemViewHolder(view)
    }

    override fun onBindViewHolder(holder: ItemViewHolder, position: Int) {
        holder.bind(dataList[position], context)

        holder.itemView.setOnClickListener { view ->
            Toast.makeText(view.context, "$position 아이템 클릭!", Toast.LENGTH_SHORT).show()

            // open another activity on item click
            val intent = Intent(context, AnotherActivity::class.java)
            intent.putExtra("image_name", dataList[position].photo) // put image data in Intent
            context.startActivity(intent) // start Intent

        }

        holder.itemView.setOnLongClickListener { view ->
            Toast.makeText(view.context, "$position 아이템 롱클릭!", Toast.LENGTH_SHORT).show()
            return@setOnLongClickListener true
        }
    }

    override fun getItemCount(): Int {
        return dataList.size
    }
}
[스탭6] 메인액티비티클래스(MainActivity.kt)에 리사이클러뷰에 대한 선언 및 초기화를 진행합니다.
ListView Adapter와 달리 RecyclerView Adapter는 레이아웃 매니저 (LayoutManager)를 설정해야합니다.
기본적으로 LinearLayoutManager, GridLayoutManager , StaggeredGridLayoutManager 등 3가지의 LayoutManager 라이브러리를 지원합니다. StaggeredGridLayoutManager는 항목을 지그재그로 표시하는 데 사용됩니다.
StaggeredGridLayoutManager 기본 수직방향 사용시 코드는 다음과 같습니다. 숫자 3은 그리드의 열 수를 의미합니다.
        val staggeredGridLayoutManager =
            StaggeredGridLayoutManager(3, LinearLayoutManager.VERTICAL)
        recycler_view.layoutManager =
            staggeredGridLayoutManager
StaggeredGridLayoutManager 수평방향 사용시 코드는 다음과 같습니다.
        val staggeredGridLayoutManager =
            StaggeredGridLayoutManager(3, LinearLayoutManager.HORIZONTAL)
        recycler_view.layoutManager =
            staggeredGridLayoutManager
StaggeredGridLayoutManager 클래스를 열어보면 인자값에 대한 정보를 자세히 알 수 있어요
    /**
     * Creates a StaggeredGridLayoutManager with given parameters.
     *
     * @param spanCount   If orientation is vertical, spanCount is number of columns. If
     *                    orientation is horizontal, spanCount is number of rows.
     * @param orientation {@link #VERTICAL} or {@link #HORIZONTAL}
     */
    public StaggeredGridLayoutManager(int spanCount, int orientation) {
        mOrientation = orientation;
        setSpanCount(spanCount);
        mLayoutState = new LayoutState();
        createOrientationHelpers();
    }
package edu.kotlin.study

import android.annotation.SuppressLint
import android.media.MediaPlayer
import android.os.Bundle
import androidx.appcompat.app.AppCompatActivity
import androidx.recyclerview.widget.GridLayoutManager
import androidx.recyclerview.widget.LinearLayoutManager
import kotlinx.android.synthetic.main.activity_main.*
import java.io.IOException
class MainActivity : AppCompatActivity() {

    private var userList = arrayListOf<DataVo>(
        DataVo("풍경1", "test3", "광주시", 20, "img_2"),
        DataVo("풍경2", "test3", "광주시", 20, "img_1"),
        DataVo("풍경3", "test3", "광주시", 20, "img_3"),
        DataVo("풍경4", "test3", "광주시", 20, "img_4"),
        DataVo("풍경5", "test3", "광주시", 20, "img_5"),
        DataVo("풍경6", "test3", "광주시", 20, "img_1"),
        DataVo("풍경7", "test3", "광주시", 20, "img_5"),
        DataVo("풍경8", "test3", "광주시", 20, "img_2"),
        DataVo("안드로이드", "test3", "광주시", 20, "user_img_03"),
        DataVo("풍경10", "test3", "광주시", 20, "img_1"),
        DataVo("풍경11", "test3", "광주시", 20, "img_4"),
        DataVo("풍경12", "test3", "광주시", 20, "img_2"),
        DataVo("풍경13", "test3", "광주시", 20, "img_1"),
        DataVo("풍경14", "test3", "광주시", 20, "img_3"),
        DataVo("풍경15", "test3", "광주시", 20, "img_2")

    )

    override fun onCreate(savedInstanceState: Bundle?) {
        super.onCreate(savedInstanceState)
        setContentView(R.layout.activity_main)

        val mAdapter = CustomAdapter(this, userList)
        recycler_view.adapter = mAdapter

//        val layout = LinearLayoutManager(this)
//        recycler_view.layoutManager = layout
//        recycler_view.setHasFixedSize(true)

        val staggeredGridLayoutManager =
            StaggeredGridLayoutManager(3, LinearLayoutManager.VERTICAL)
        recycler_view.layoutManager =
            staggeredGridLayoutManager

    }

}
[AnotherActivity.kt]
리사이클러뷰의 아이템을 클릭했을 때 호출되는 창을 하나 생성하였습니다. 새로 호출되는 창에서는 이미지를 크게 보여주게 됩니다.
package edu.kotlin.study

import androidx.appcompat.app.AppCompatActivity
import android.os.Bundle
import kotlinx.android.synthetic.main.activity_another.*

class AnotherActivity : AppCompatActivity() {
    override fun onCreate(savedInstanceState: Bundle?) {
        super.onCreate(savedInstanceState)
        setContentView(R.layout.activity_another)

//        var receiveData1 = intent.getStringExtra("data1")
//        var receiveData2 = intent.getIntExtra("data2", 0)

        var receiveData1 = intent.getStringExtra("image_name")

        if (receiveData1 != "") {
            val resourceId =
                resources.getIdentifier(receiveData1, "drawable", packageName)

            if (resourceId > 0) {
                imageView1.setImageResource(resourceId)
            } else {
                imageView1.setImageResource(R.mipmap.ic_launcher_round)
            }
        } else {
            imageView1.setImageResource(R.mipmap.ic_launcher_round)
        }

    }
}
[activity_another.xml]
<?xml version="1.0" encoding="utf-8"?>
<LinearLayout
    xmlns:android="http://schemas.android.com/apk/res/android"
    android:layout_width="match_parent"
    android:layout_height="match_parent"
    android:orientation="vertical">

    <TextView
        android:id="@+id/textView1"
        android:layout_width="match_parent"
        android:layout_height="wrap_content"
        android:gravity="center"
        android:text="신규 액티비티"
        android:textAppearance="@style/TextAppearance.AppCompat.Display2" />
    <ImageView
        android:id="@+id/imageView1"
        android:layout_width="match_parent"
        android:layout_height="match_parent"
        android:scaleType="centerCrop" />
</LinearLayout>
[build.gradle(Module:app)]
apply plugin: 'com.android.application'
apply plugin: 'kotlin-android'
apply plugin: 'kotlin-android-extensions'

android {
    compileSdkVersion 29

    defaultConfig {
        applicationId "edu.kotlin.study"
        minSdkVersion 22
        targetSdkVersion 29
        versionCode 1
        versionName "1.0"

        testInstrumentationRunner "androidx.test.runner.AndroidJUnitRunner"
    }

    buildTypes {
        release {
            minifyEnabled false
            proguardFiles getDefaultProguardFile('proguard-android-optimize.txt'), 'proguard-rules.pro'
        }
    }
}

dependencies {
    implementation fileTree(dir: "libs", include: ["*.jar"])
    implementation "org.jetbrains.kotlin:kotlin-stdlib:$kotlin_version"
    implementation 'androidx.core:core-ktx:1.3.1'
    implementation 'androidx.appcompat:appcompat:1.2.0'
    implementation 'androidx.constraintlayout:constraintlayout:2.0.1'
    implementation 'androidx.legacy:legacy-support-v4:1.0.0'
    implementation 'androidx.recyclerview:recyclerview:1.1.0'
    testImplementation 'junit:junit:4.12'
    androidTestImplementation 'androidx.test.ext:junit:1.1.2'
    androidTestImplementation 'androidx.test.espresso:espresso-core:3.3.0'

}
[build.gradle(Project)]
// Top-level build file where you can add configuration options common to all sub-projects/modules.
buildscript {
    ext.kotlin_version = "1.3.72"
    repositories {
        google()
        jcenter()
    }
    dependencies {
        classpath "com.android.tools.build:gradle:4.0.1"
        classpath "org.jetbrains.kotlin:kotlin-gradle-plugin:$kotlin_version"

        // NOTE: Do not place your application dependencies here; they belong
        // in the individual module build.gradle files
    }
}

allprojects {
    repositories {
        google()
        jcenter()
    }
}

task clean(type: Delete) {
    delete rootProject.buildDir
}
[REFERENCE]
- https://developer.android.com/guide/topics/ui/layout/recyclerview.html#structuredeveloper.android.com/jetpack/androidx/releases/recyclerview
- developer.android.com/reference/androidx/recyclerview/widget/StaggeredGridLayoutManager
[연관 글]
[android : kotlin] 코틀린 RecyclerView 사용방법 및 예제
[android : kotlin] 코틀린 RecyclerView 아이템 추가 및 삭제하는 방법
[android : kotlin] 코틀린 JSON 객체 파싱하는 방법 및 RecyclerView 아이템 추가 및 삭제방법 : Assets폴더 내에 json파일 파싱방법
[android : kotlin] 코틀린 RecyclerView 와 GridLayout를 함께 사용하는 방법 및 예제 (GridLayoutManager)